
0. Context
A few years ago, we decided to smart-home-enable our camper van — not really out of necessity, but more as a “can we actually do it?” experiment.
It worked… mostly. But over time, a few issues appeared:
-
Not reproducible: too many cables, not exactly user-friendly.
-
GPIO disconnections: even with a screw-in GPIO board, the heat and vibration in the van caused it to come loose several times.
-
Power consumption: a Raspberry Pi 4 draws between 7 W and 12 W. On a 12 V battery with no recharging, the van would be flat in 4–7 days just from that. Add in the fridge, lights, heater, phones… not great.
-
Noise: the Pi 4 needs to stay under 80 °C, so in summer it constantly ran its dual fans — 35-40 dB non-stop in a small space. Not exactly WAF-friendly (Wife Acceptance Factor).
So, what are the options?
1️⃣ Sonoff ZBBridge-U – very low consumption (~3 W) but fully cloud-dependent. Not ideal when you’re travelling off-grid.
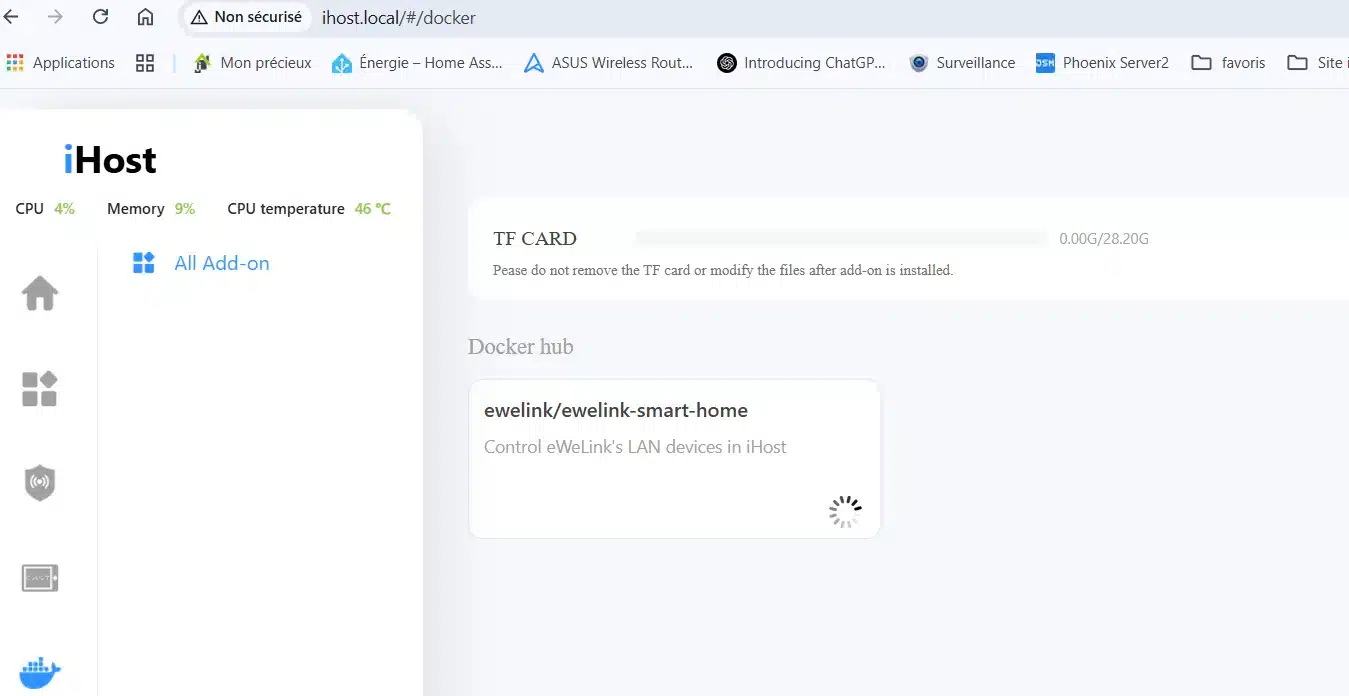
2️⃣ iHost running Home Assistant – works locally and supports multiple protocols, but 32-bit support is ending.
3️⃣ iHost with the eWeLink Cube system – simple, local, stable, and perfectly suited for my needs.
I went for option 3. The local mode is enough for me, and the stability of the system really won me over. Sure, HA offers more advanced features, but for a camper van, it’s overkill.

1. Zigbee
One of the iHost’s big strengths is its built-in Zigbee module, updated regularly. Compatibility is close to Zigbee2MQTT, so you can use Sonoff devices or gear from other brands.
In my setup, for example, I use a Linkid remote to arm or disarm the alarm.
Despite the van’s metal frame (which can act like a Faraday cage), range has been excellent.
When the van isn’t powered, the iHost can lose the state of some devices, but they resync quickly. Only my outdoor thermometer sometimes needs to be re-paired — an auto-backup function would make it perfect.
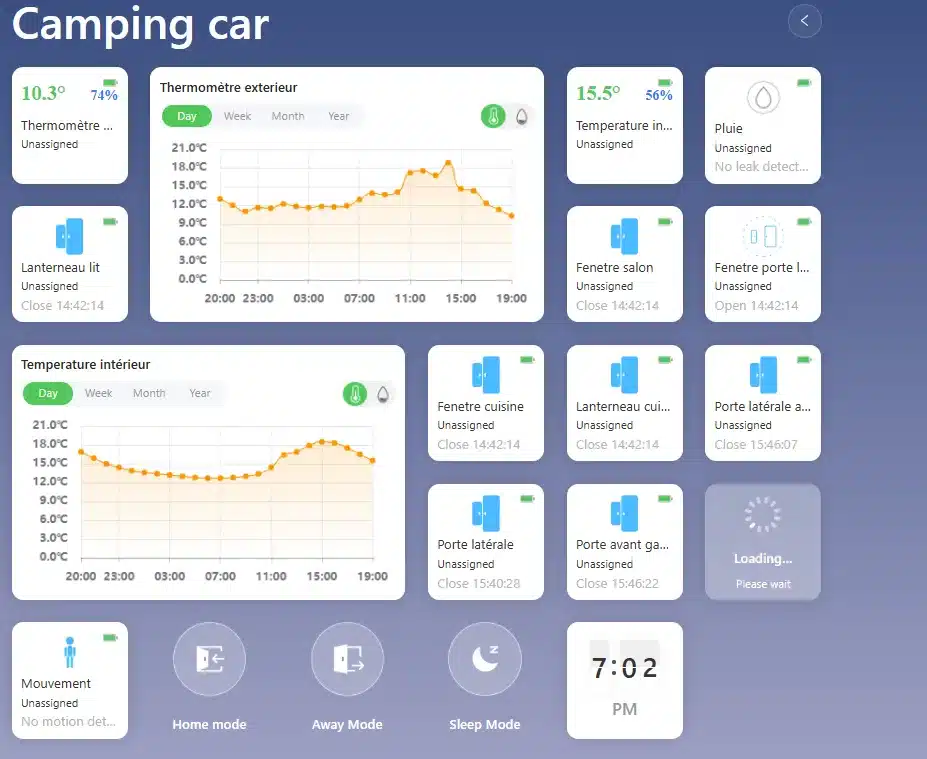
Zigbee will handle the majority of devices in the van:
-
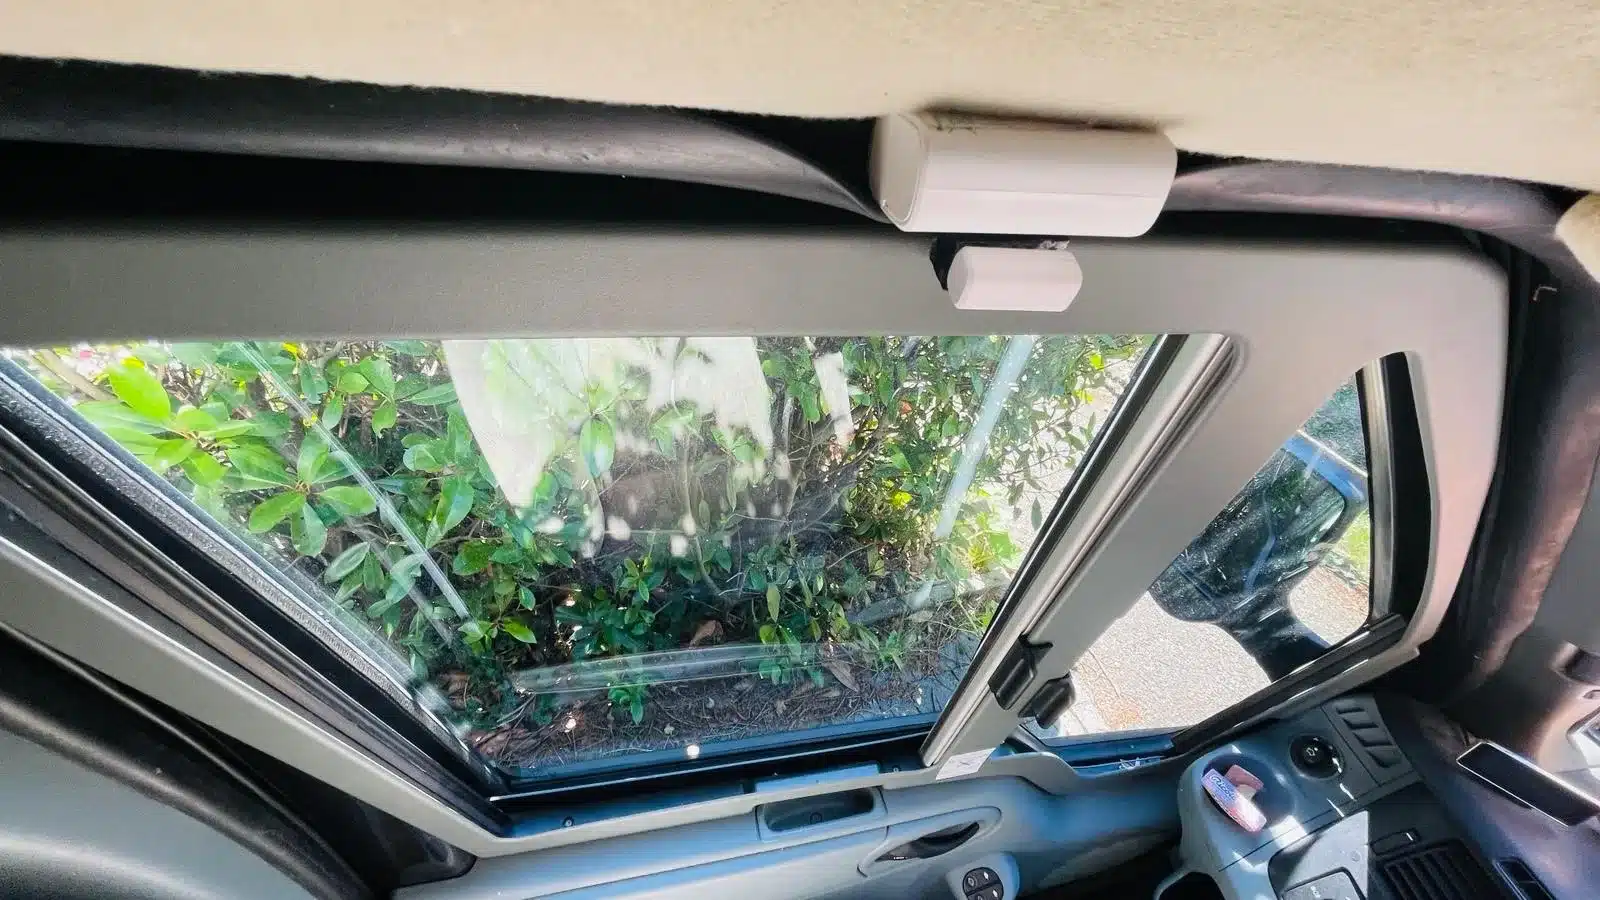
Door/window sensors (doors, roof hatches, windows) — handy for intrusion or rain alerts.
-
An indoor thermometer to control cooling in summer.
-
An outdoor thermometer to decide when to open vents — or just how to dress in the morning!
-
A probe thermometer for the fridge (to detect failures early).
-
Two water-leak sensors: one for the clean-water tank, another as a rain detector (simple but effective).
-
A motion detector for intrusions.
-
A remote control to select alarm modes.
I even tried repurposing a door sensor to detect the grey-water tank overflow, but it got dirty too fast. Same with the clean-water level sensor — calcium buildup blocked it quickly. There are better solutions, but they all require steady power, which doesn’t fit a mobile setup.

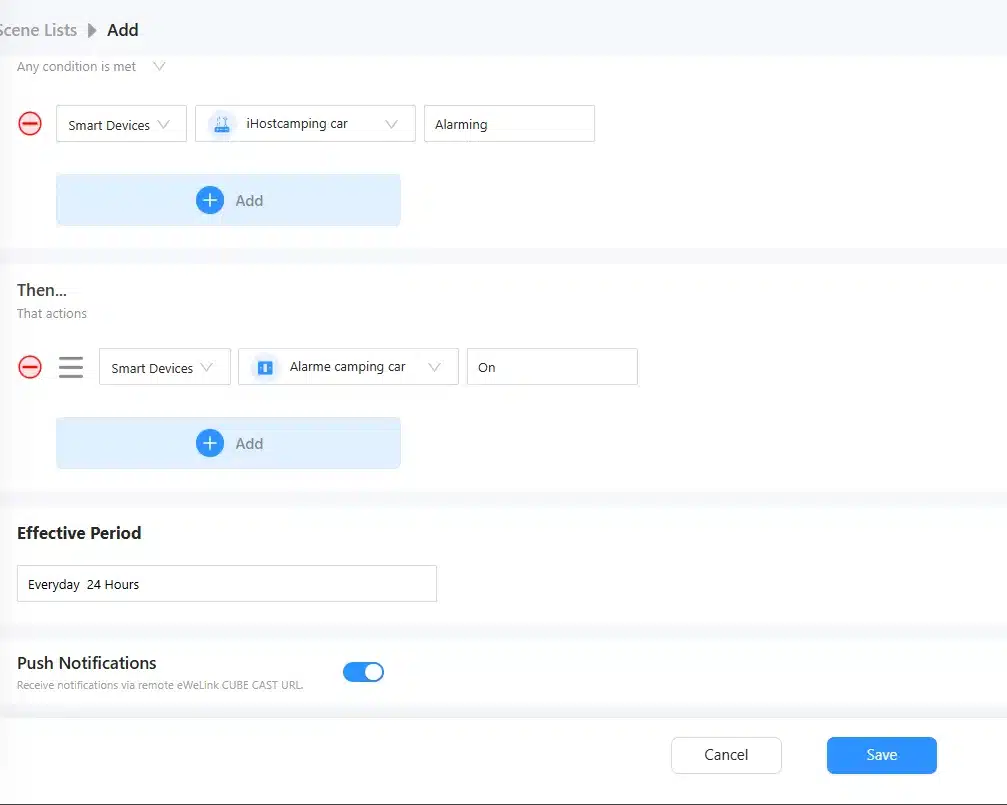
The scene system in iHost works incredibly well — smooth, fast, and very plug-and-play.
Same goes for the built-in alarm mode, which is surprisingly complete.

2.Wifi
2.1 Sonoff modules
In a van, you can’t always rely on Wi-Fi with data. Normally, that’s a limitation for Sonoff devices — unless you use an iHost.
The iHost’s big advantage: it’s local-first. Even without internet, you stay in control.
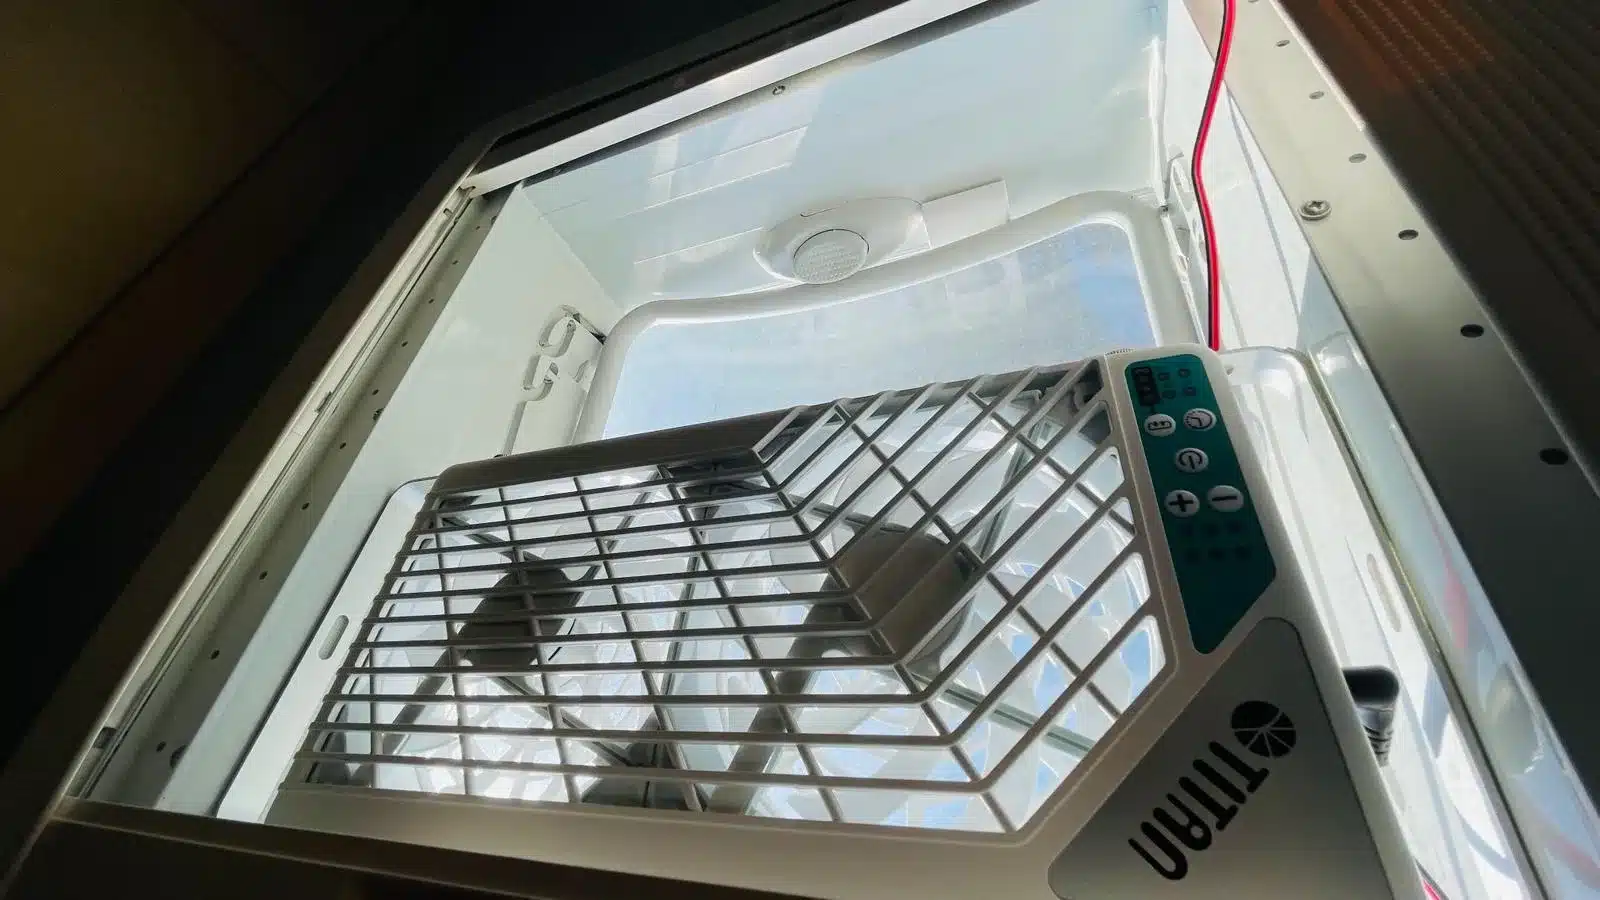
Here, I’m using a Sonoff 12 V relay module to drive a powerful alarm siren that can deter intruders. It also controls the A/C and ventilation.
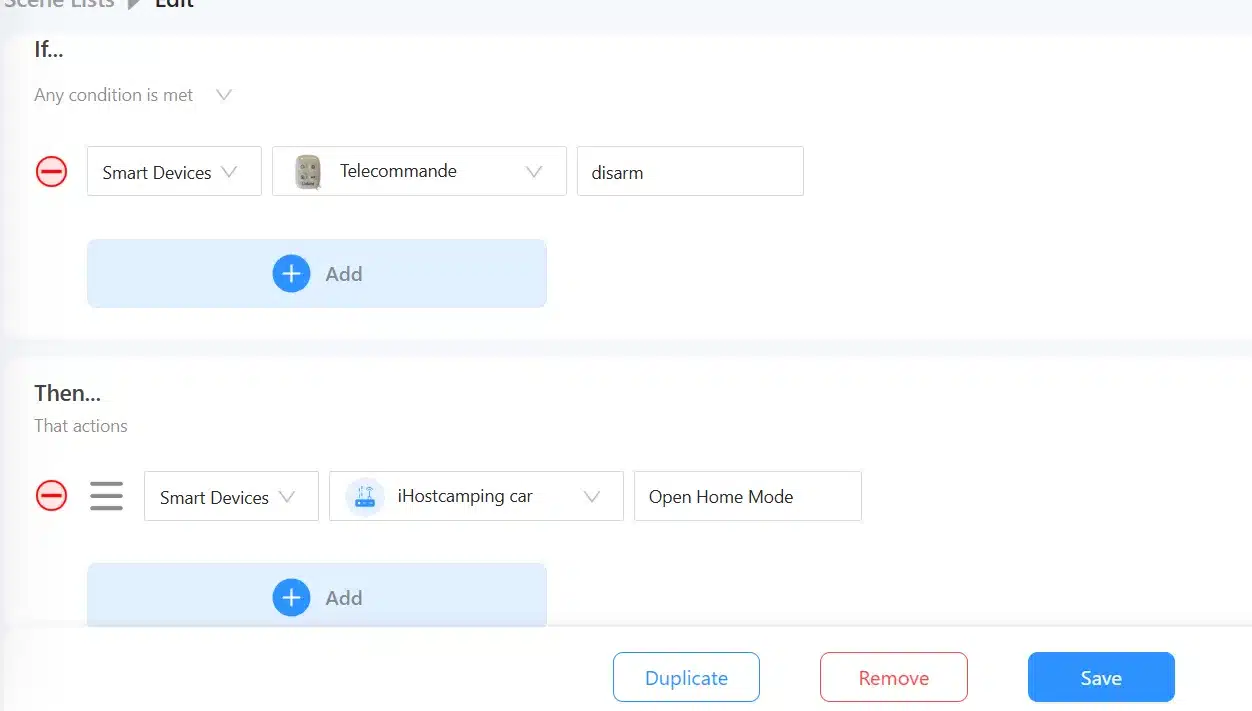
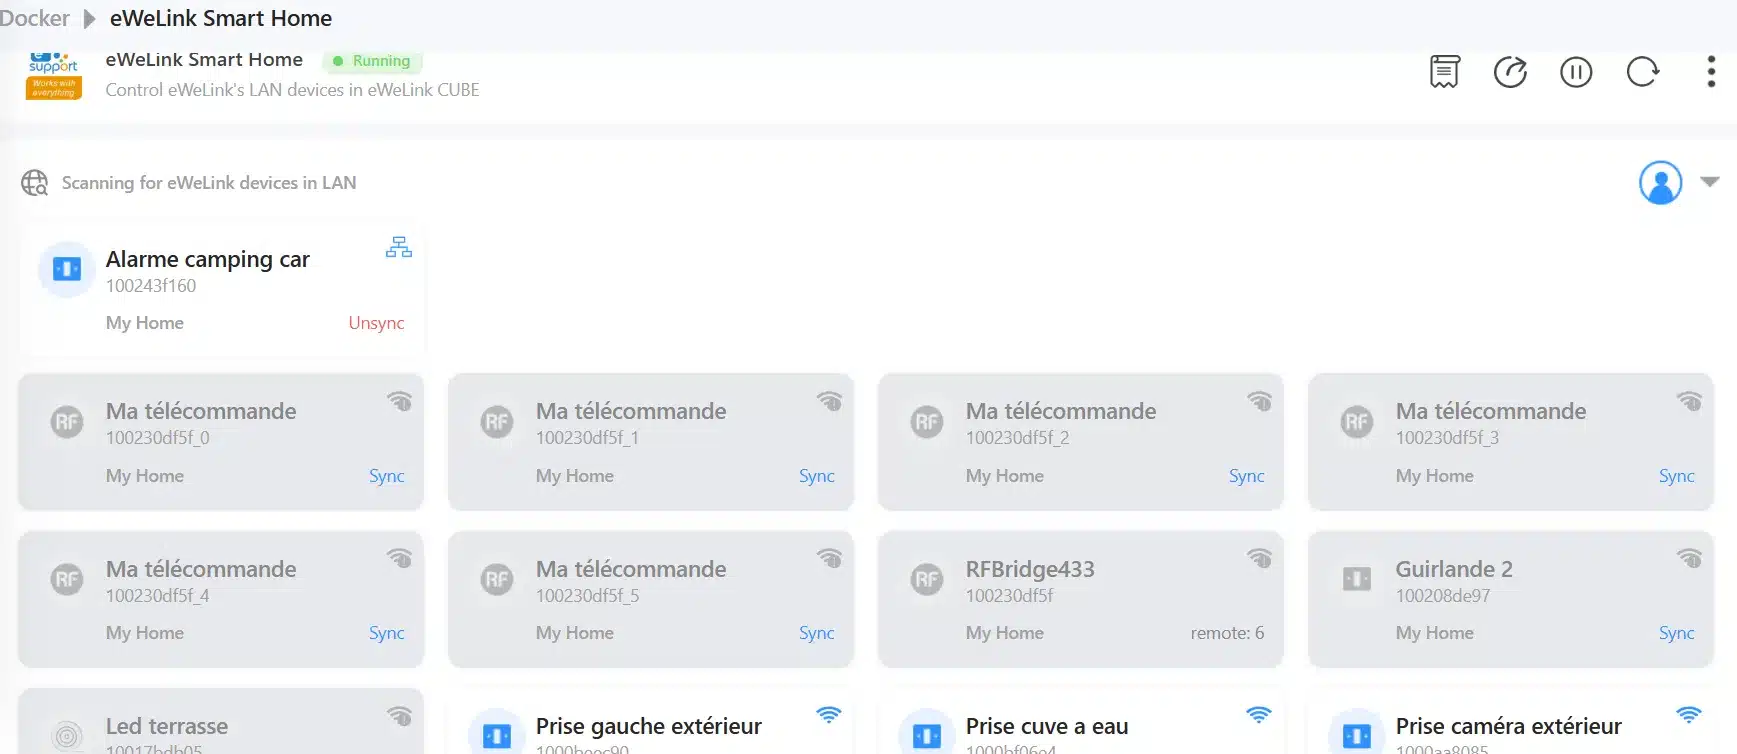
Pairing is dead-simple and only requires an internet connection during the first setup in eWeLink. After that, it works locally and remains accessible via iHost — even with offline Wi-Fi.
Just install eWeLink Cube, sync the alarm device locally… and you’re done!
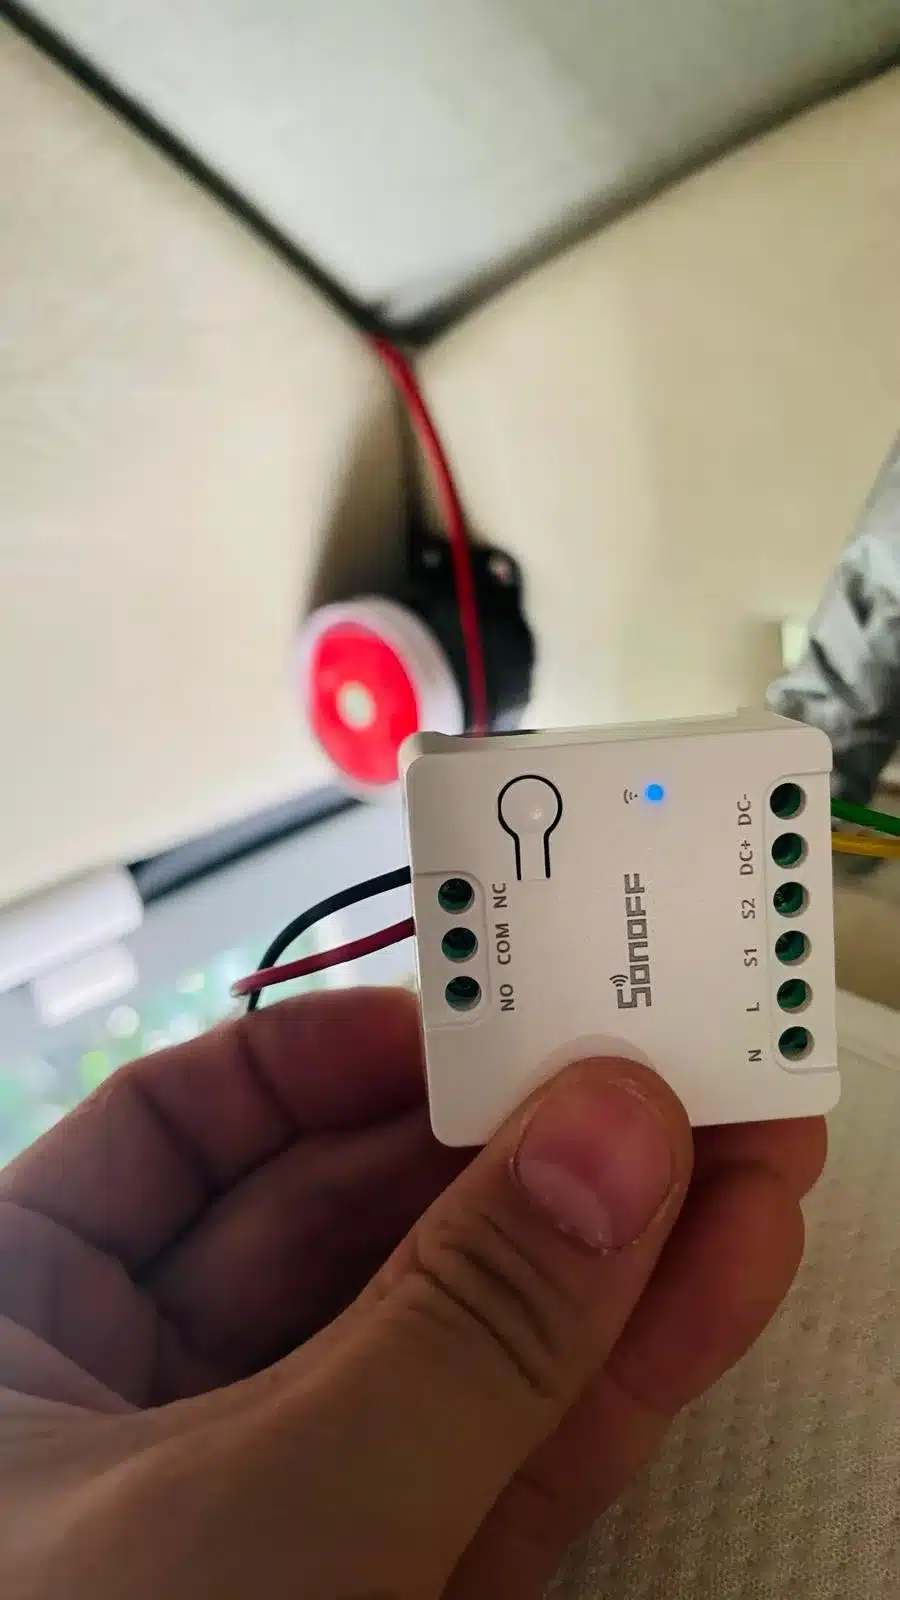
Now, when the alarm scene is triggered, the 12 V siren goes off — and trust me, nobody’s staying in that van when it does! 🔊

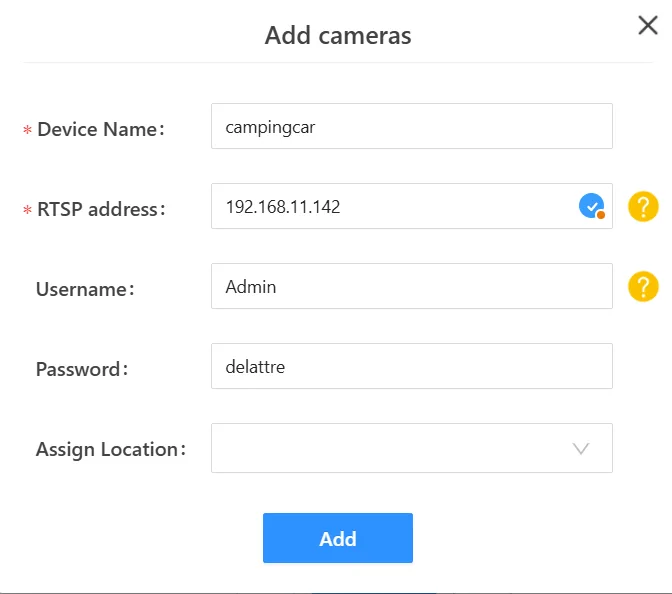
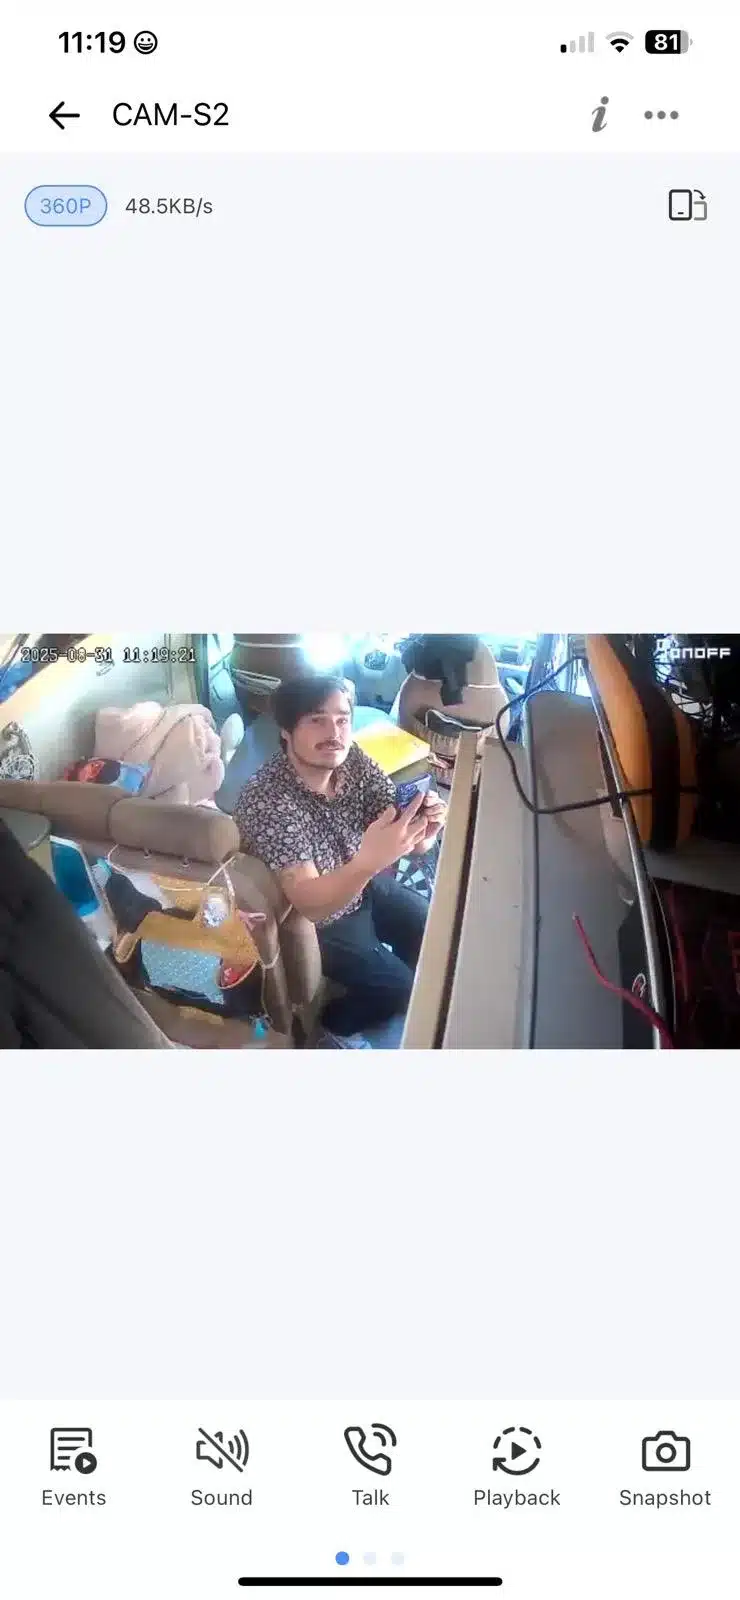
2.2 Camera RTSP
I tried the same setup with a camera, but no luck — it constantly needs internet.
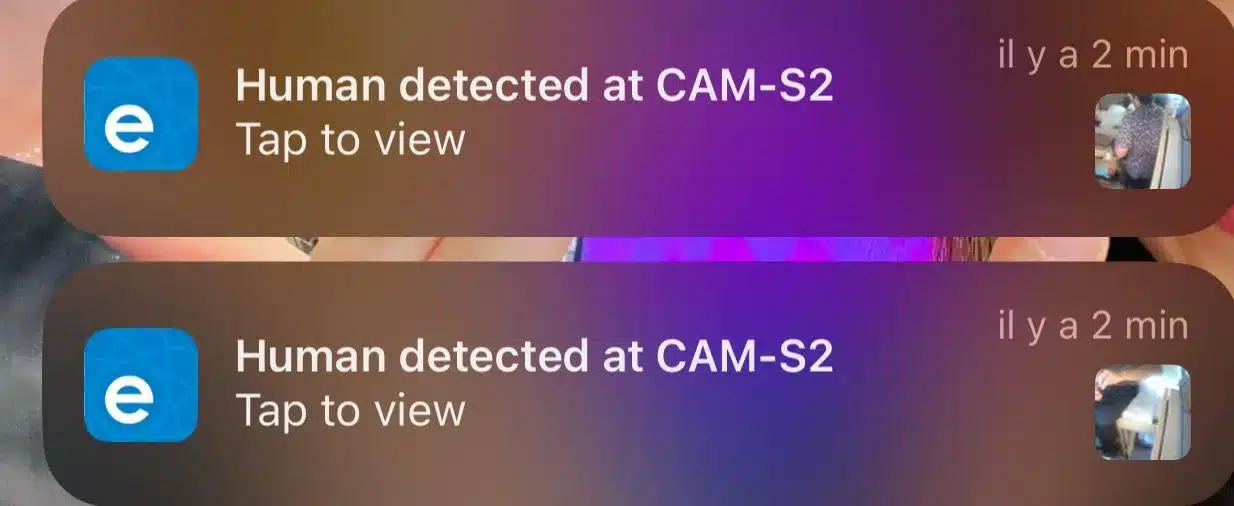
The RTSP stream only works with active data. A true offline mode would be a huge plus, especially for human-detection.
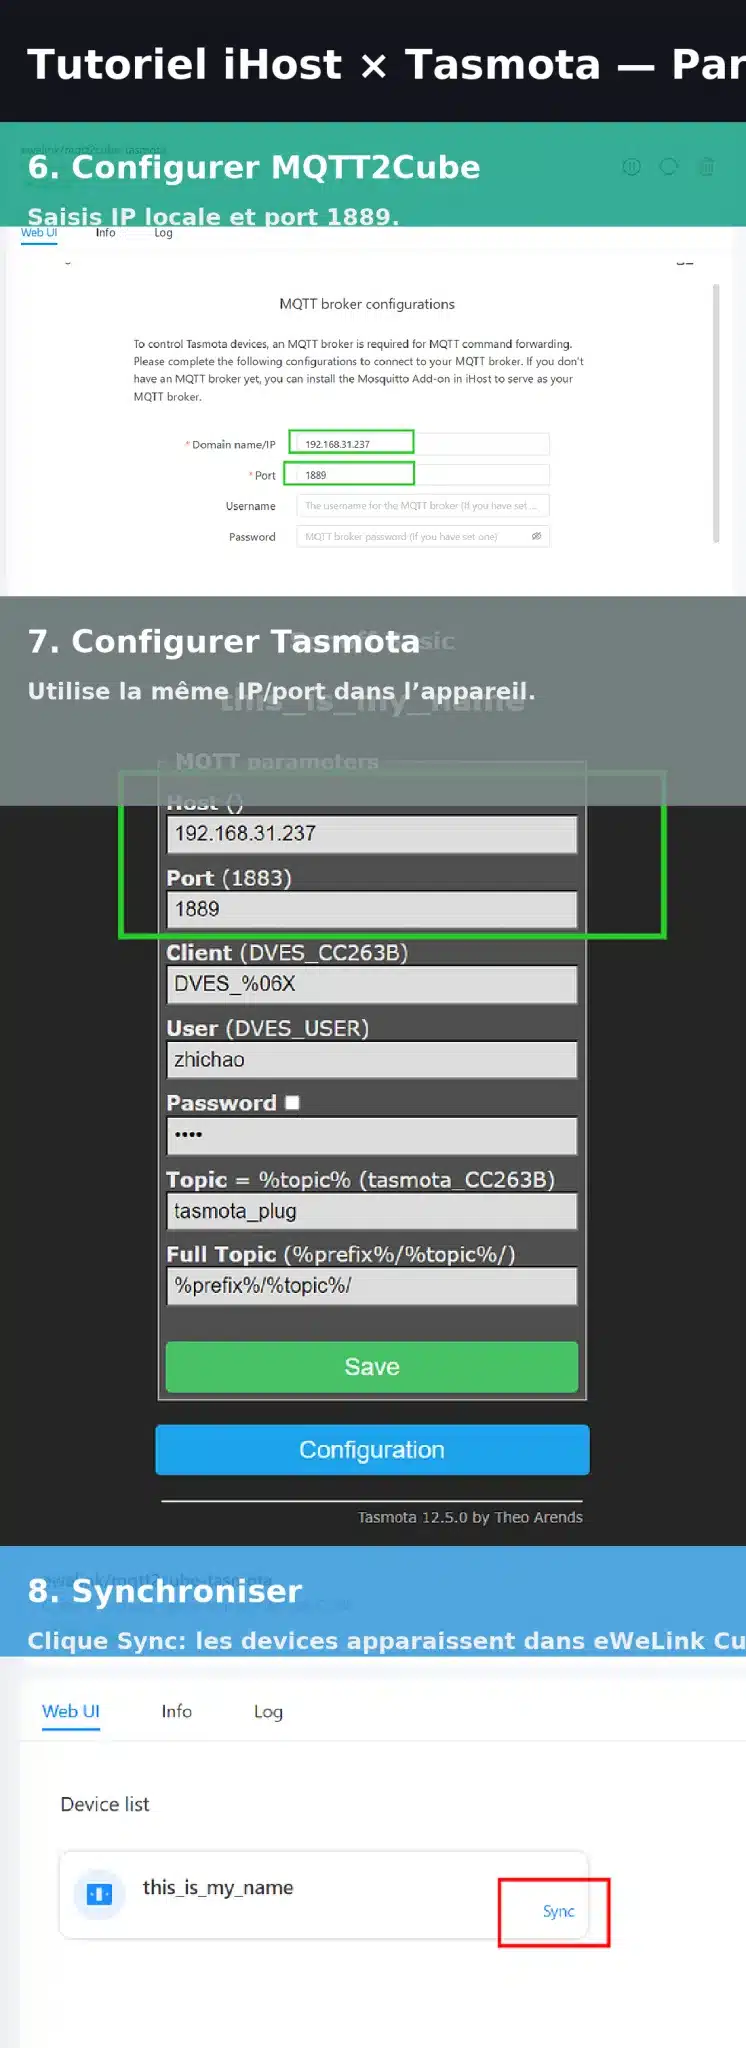
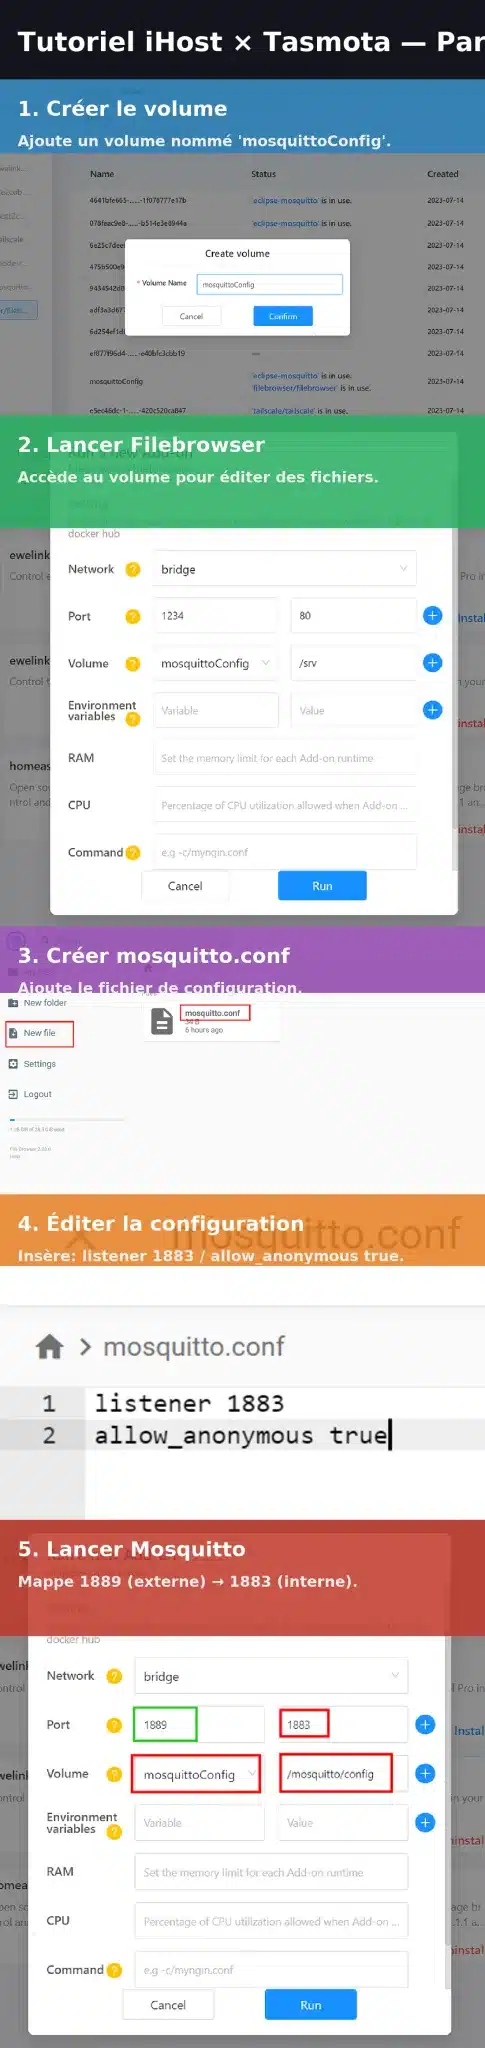
2.3 Tasmota
Even if I don’t use them (to save power), you could integrate ESP32 cameras or other Tasmota devices easily.
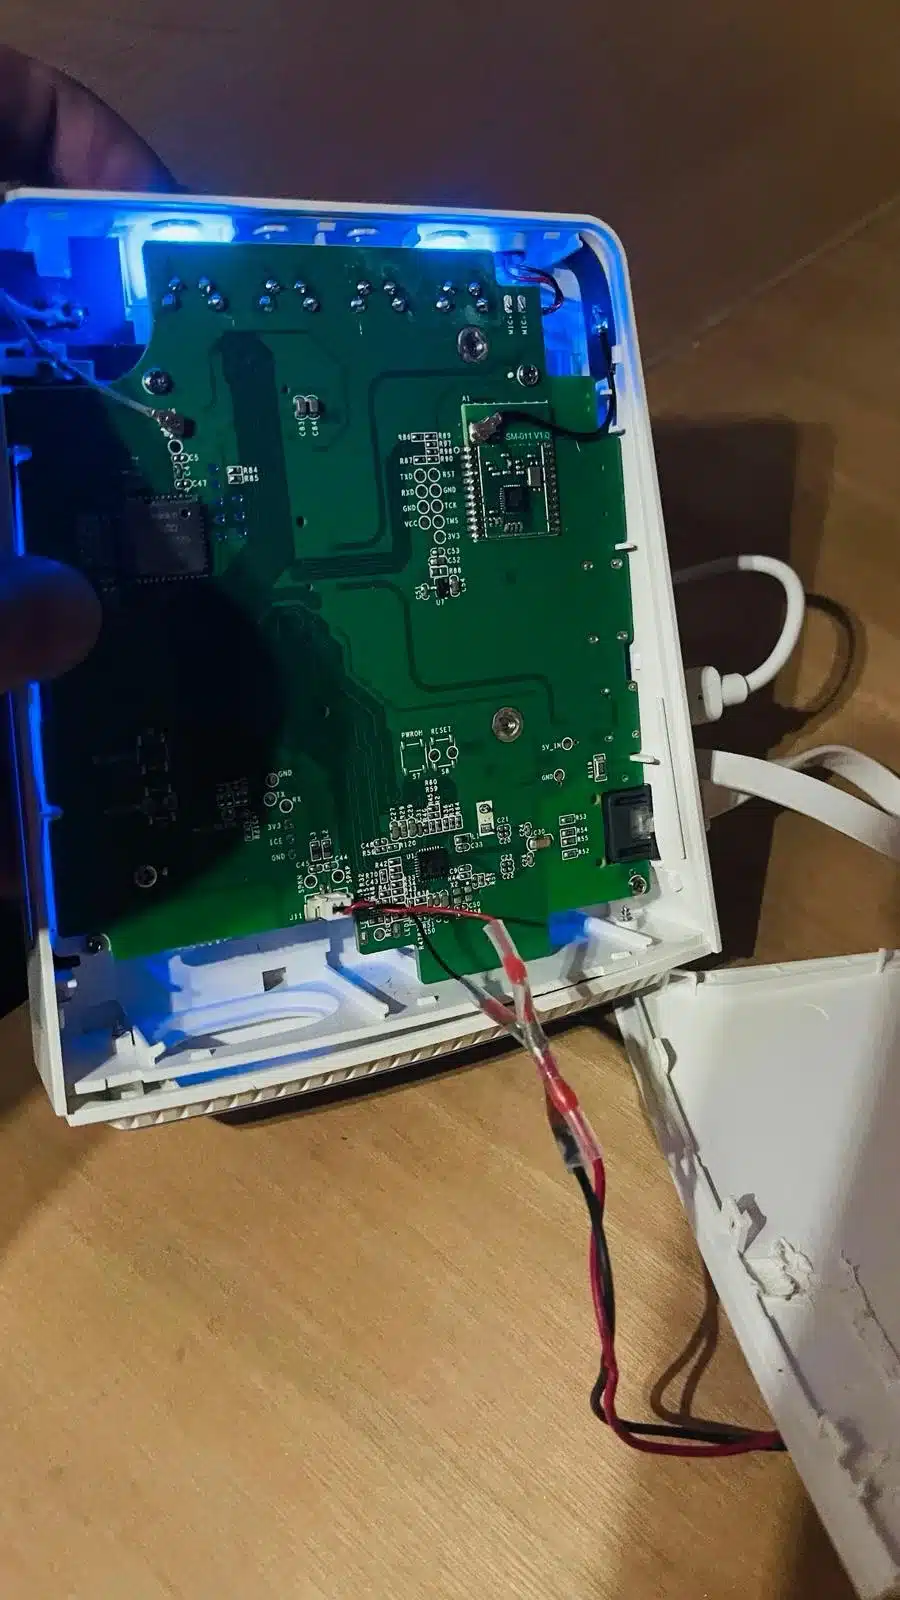
3. Speaker
The built-in speaker is, honestly, pretty weak — only useful for light notification sounds.
You can upgrade it with a 2 W speaker or pair it with a Bluetooth speaker.
I chose the 2 W option to save power — every extra module means more battery drain, which matters in a camper.
⚠️ Warning: opening the iHost voids the warranty!
Thanks to Docker, you can still do fun stuff like playing pre-recorded sounds (e.g., a welcome message when opening the van door).
We’re talking about a tiny 2 W output here, so it’s not for alarms — but it’s perfect for custom voice announcements.
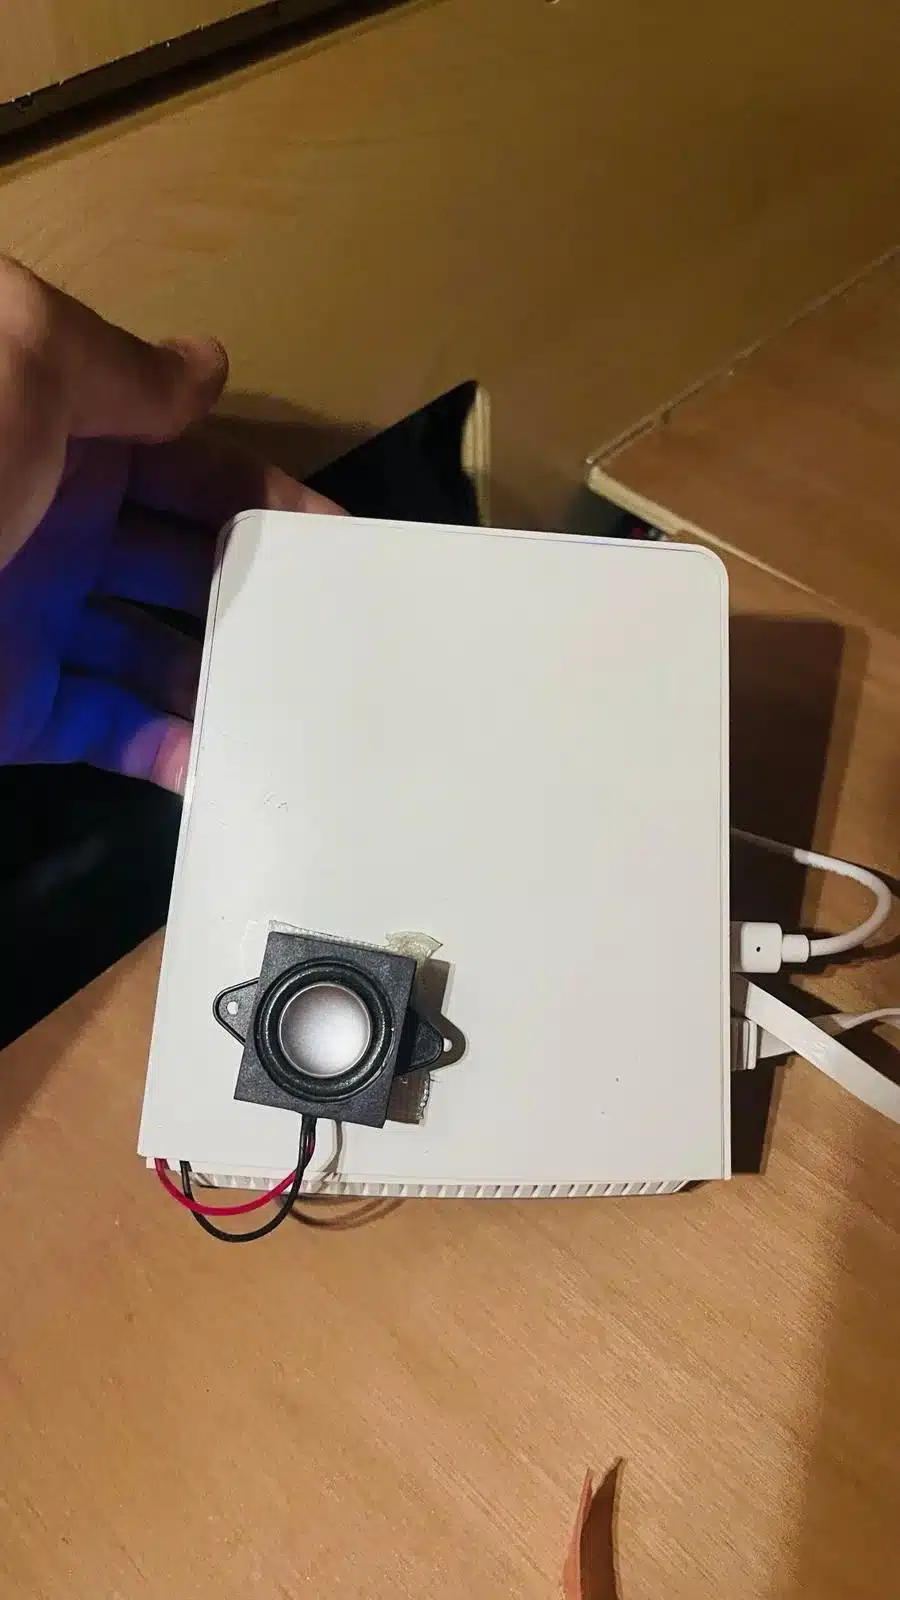
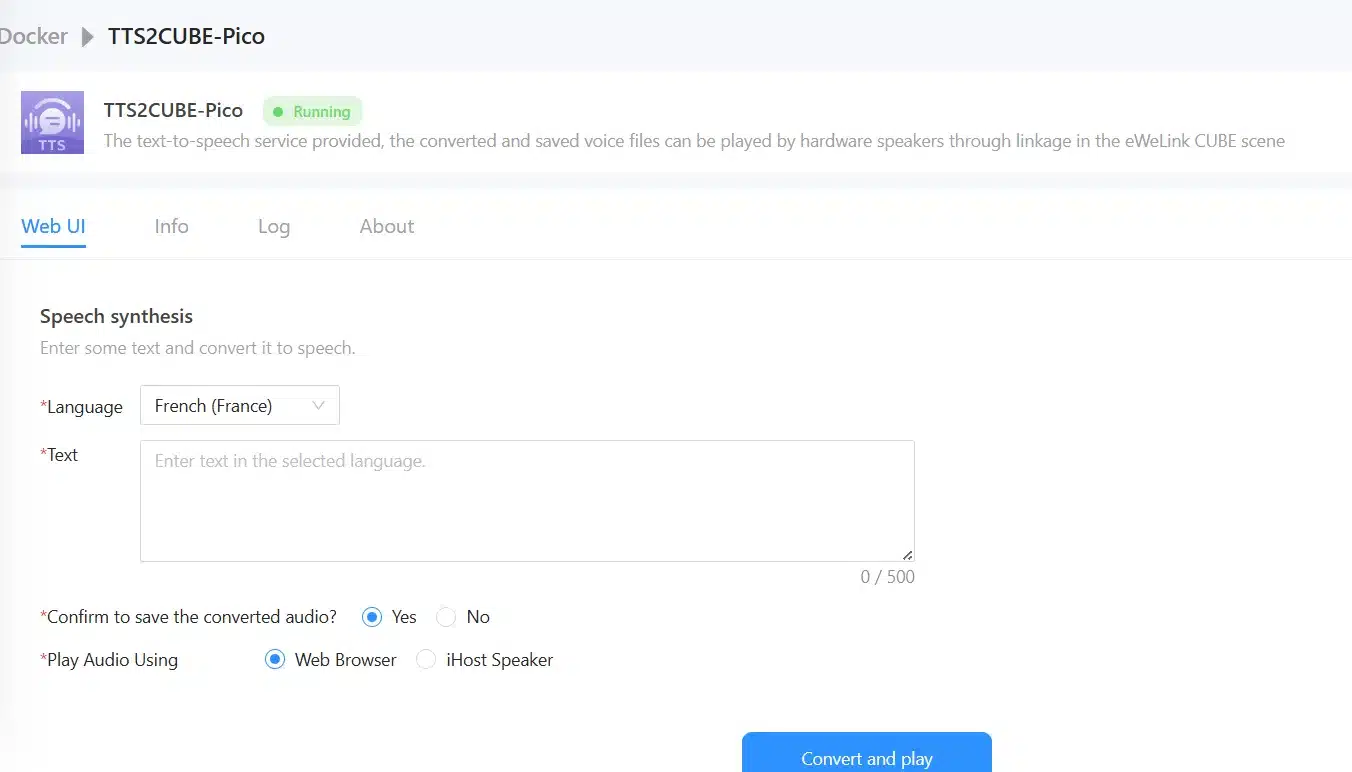
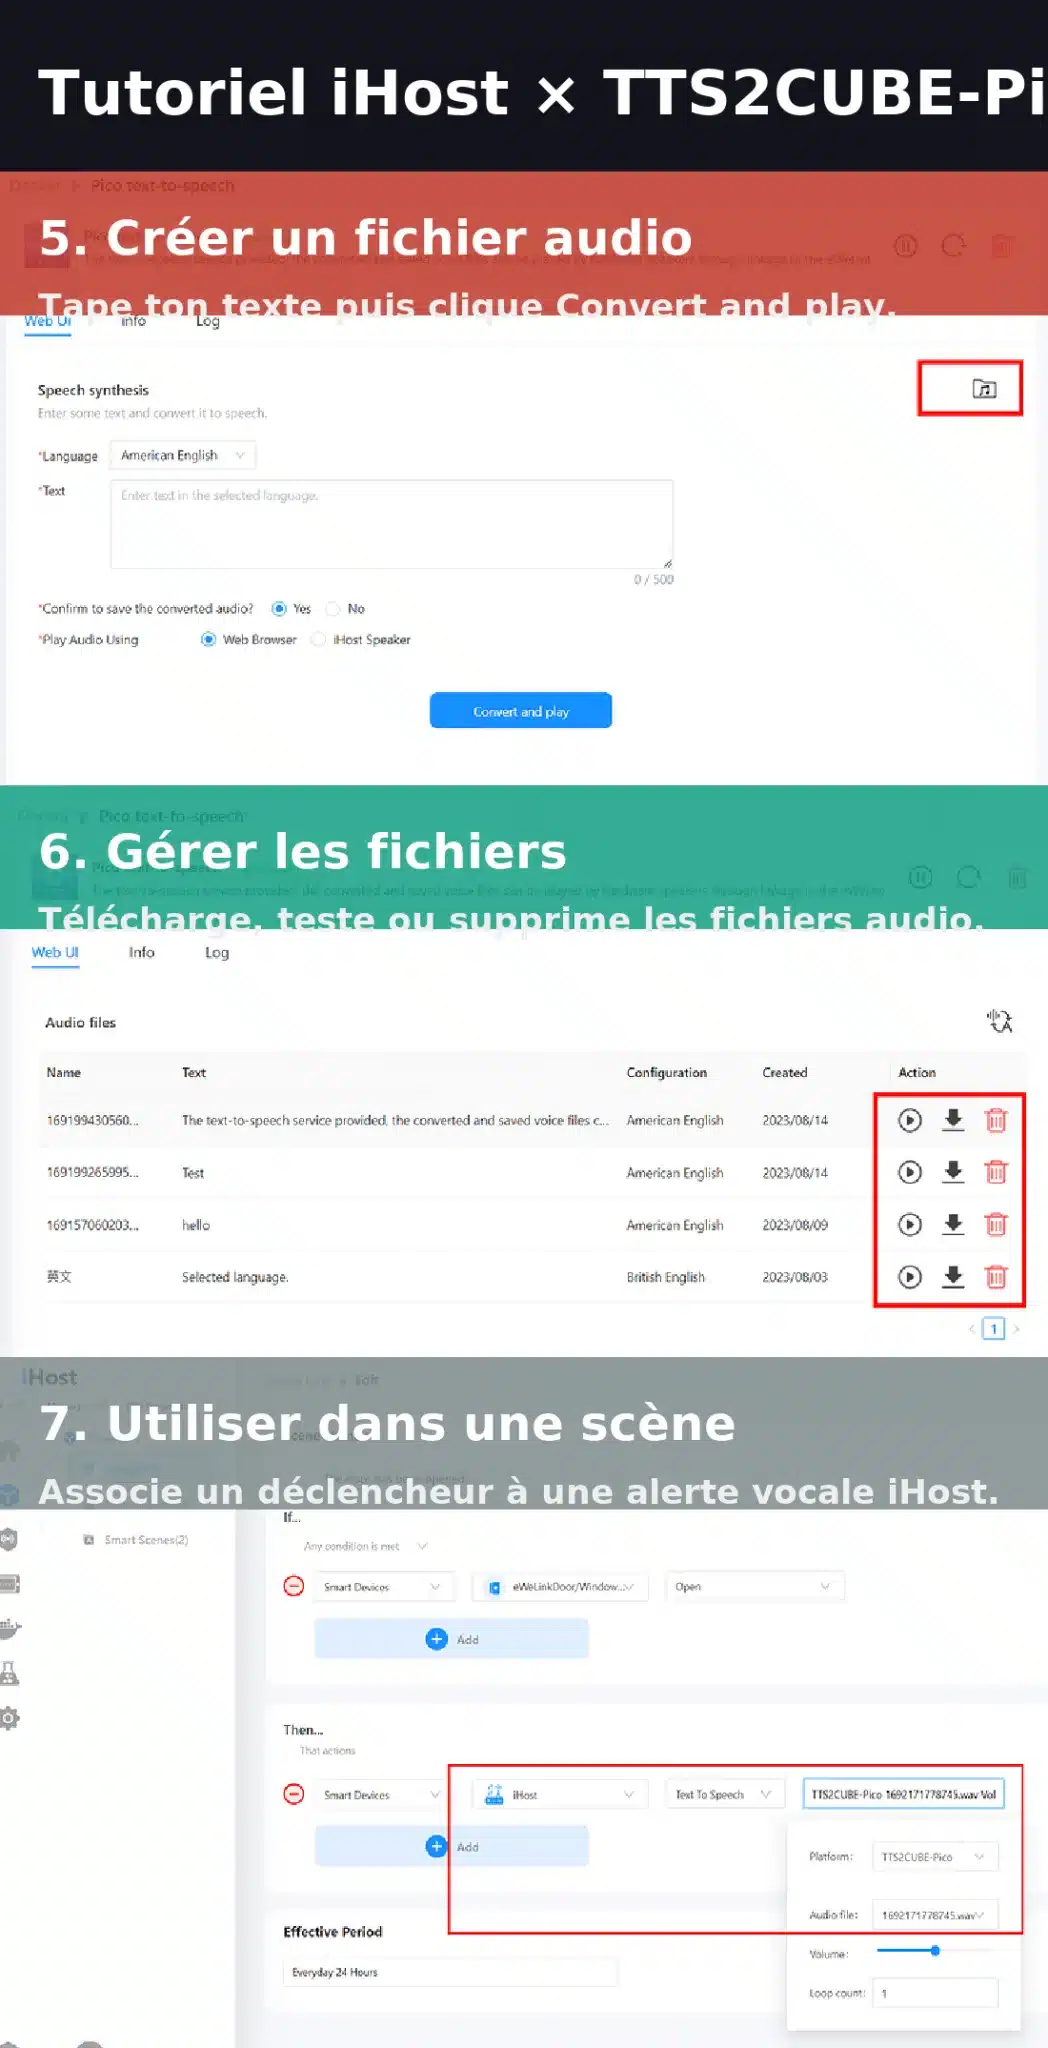
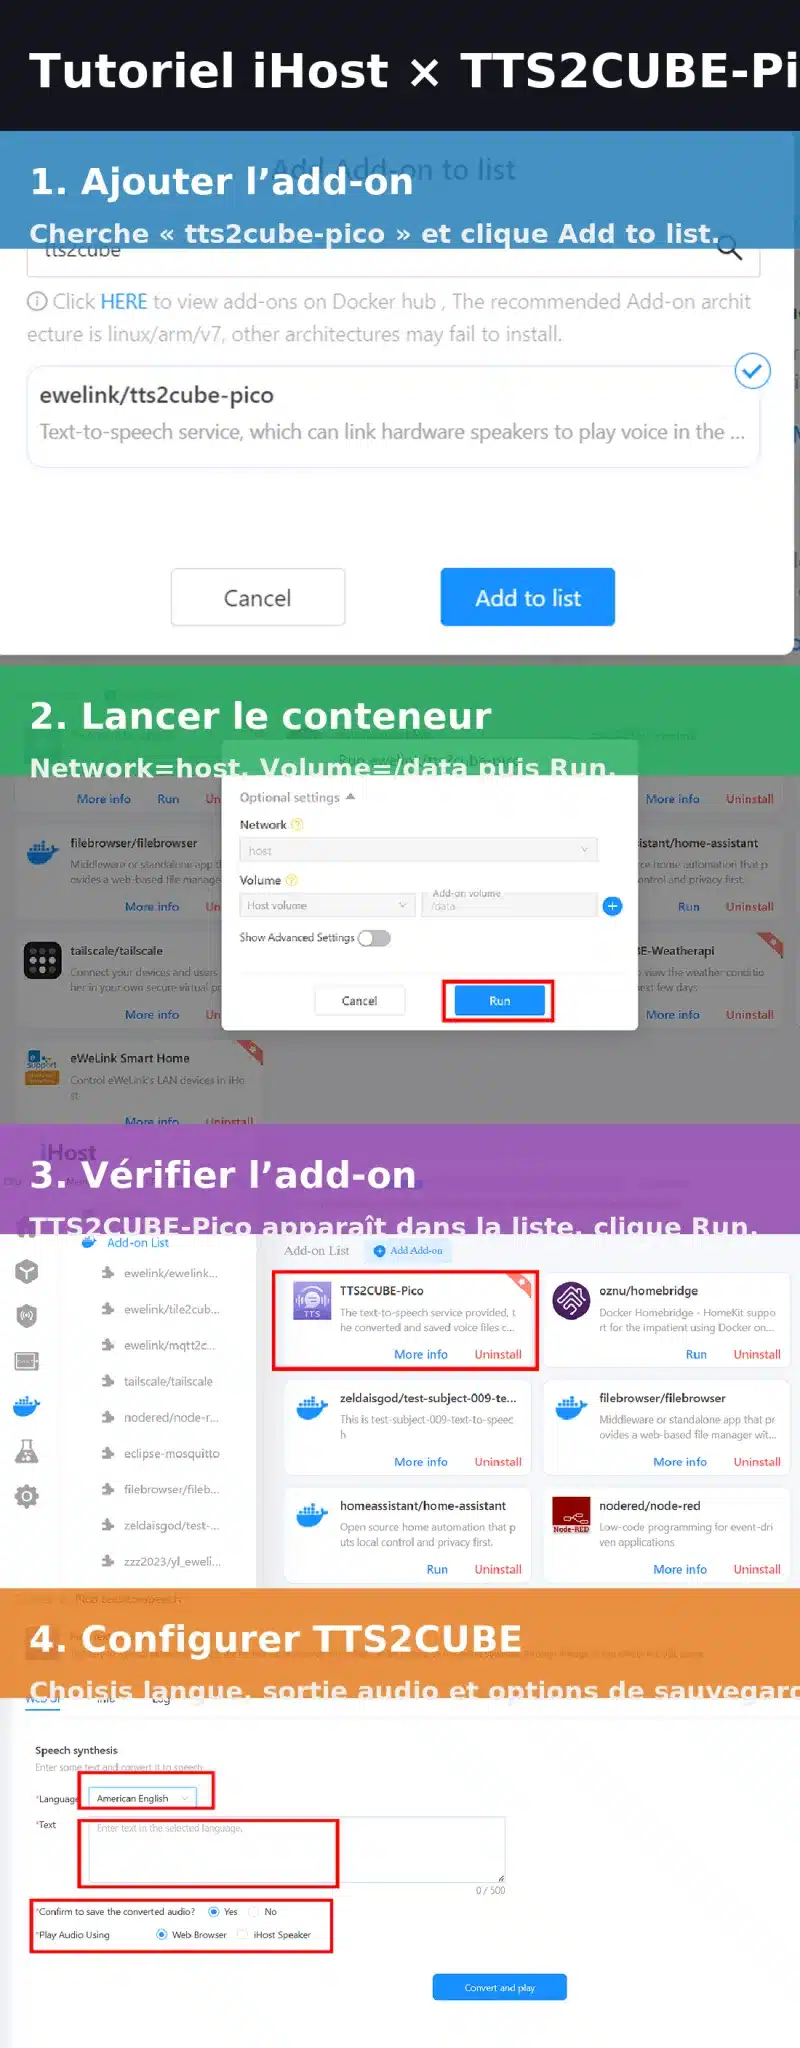
You can even add PicoTTS2Cube in Docker for direct text-to-speech!
4. Accès extérieur
4. Remote Access
Two options here:
1️⃣ Create a Tailscale Docker container — free and super easy.
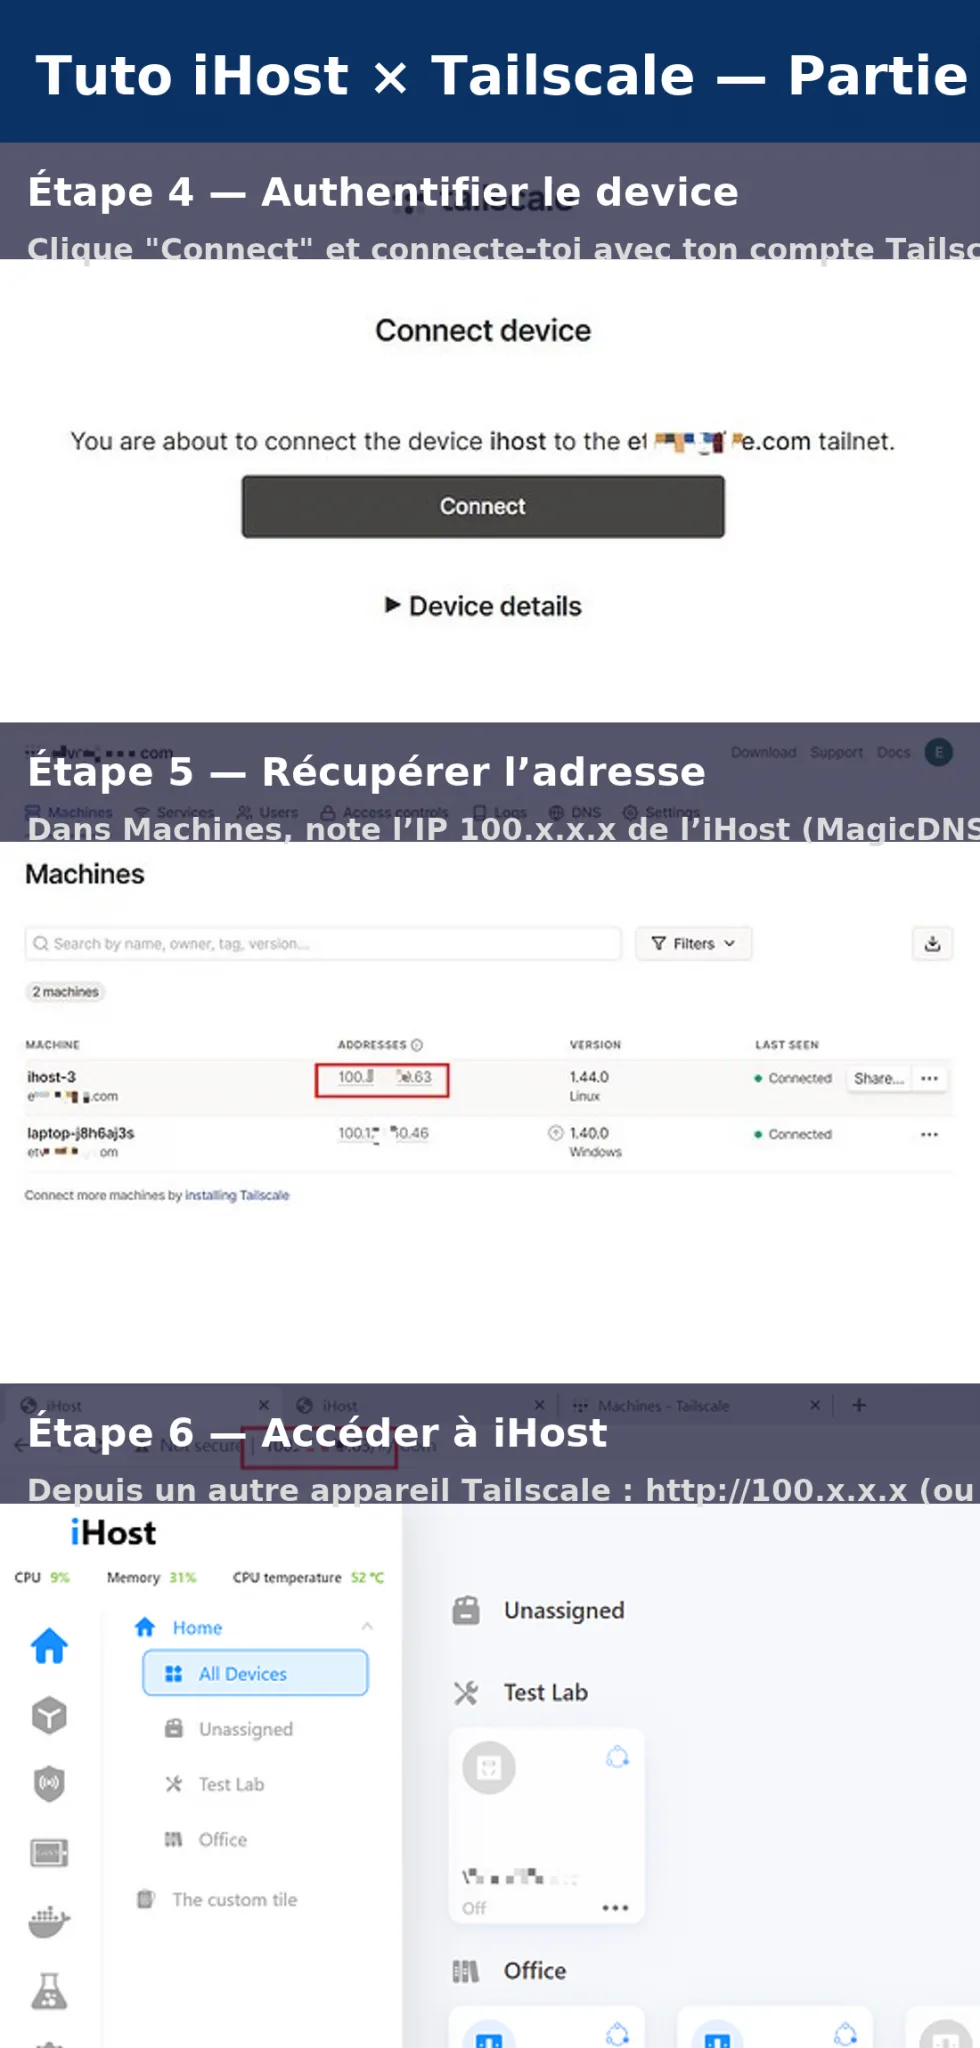
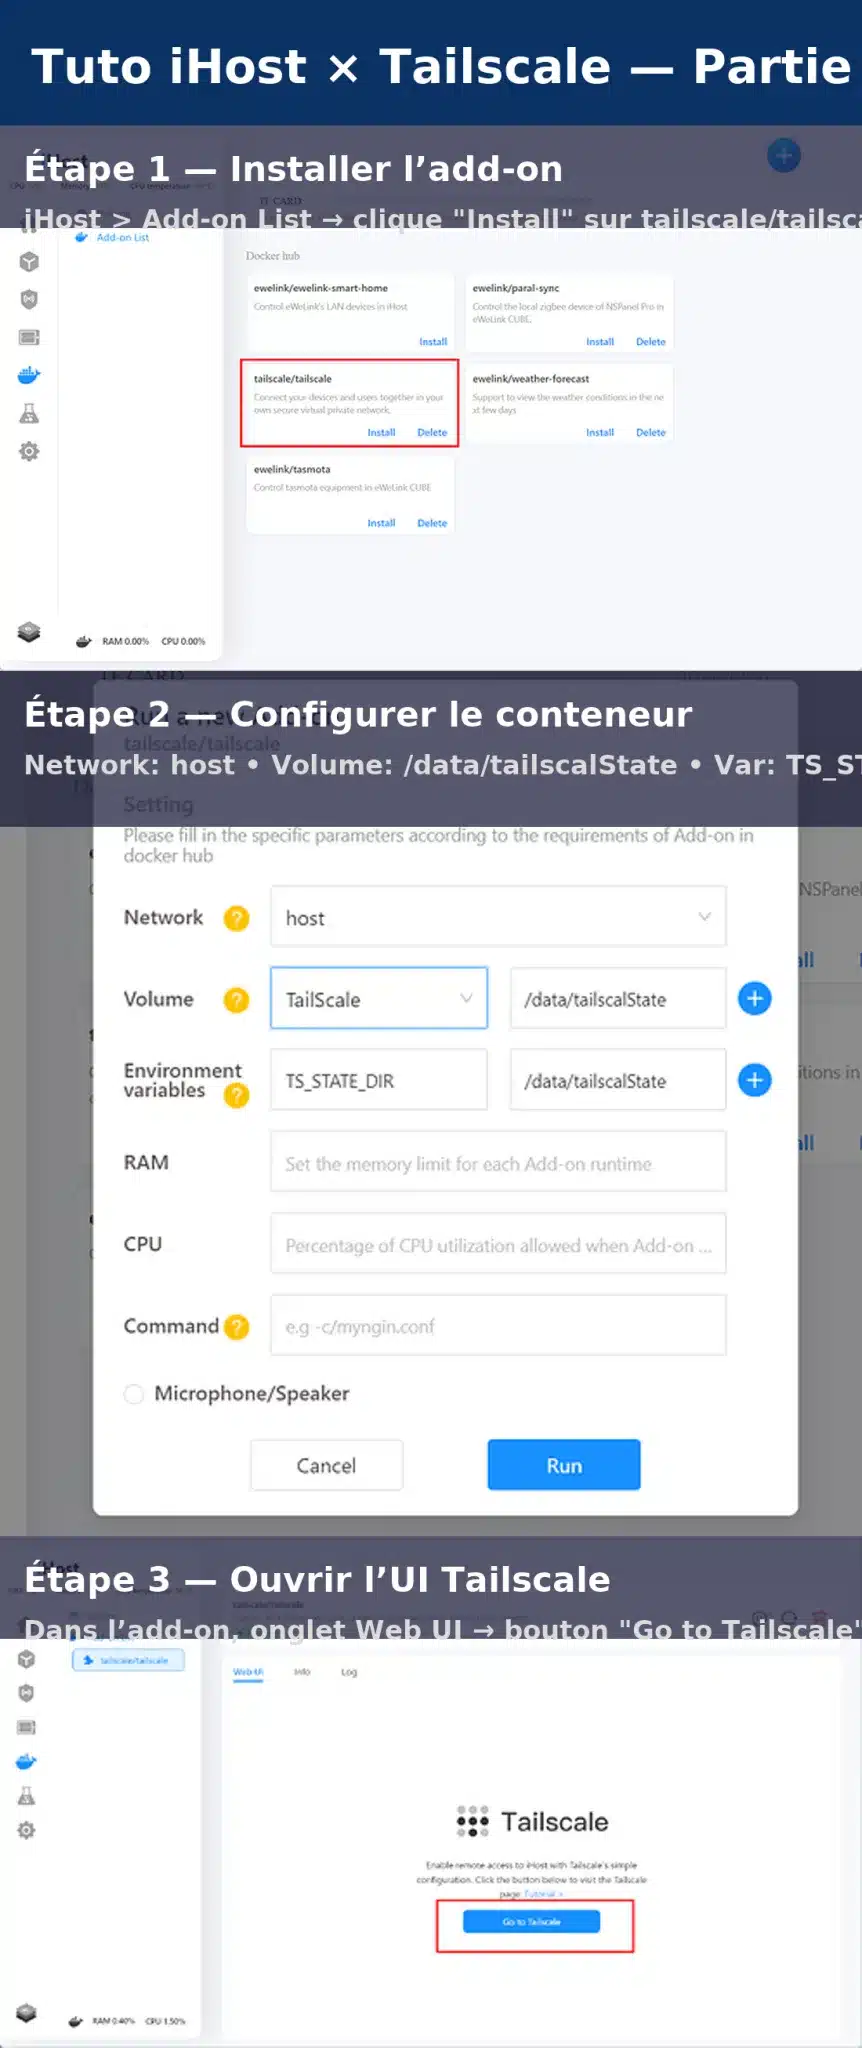
P
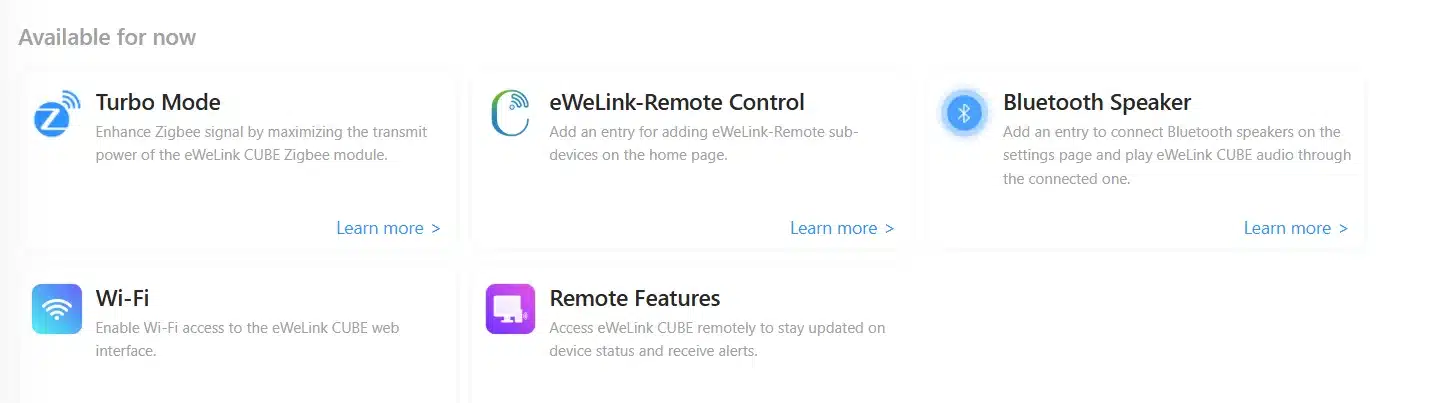
2️⃣ Or, since the latest update, enable native remote access directly on iHost!
Activate Pilot Features and Remote Features → and boom, access your dashboard or eWeLink Cast from anywhere.
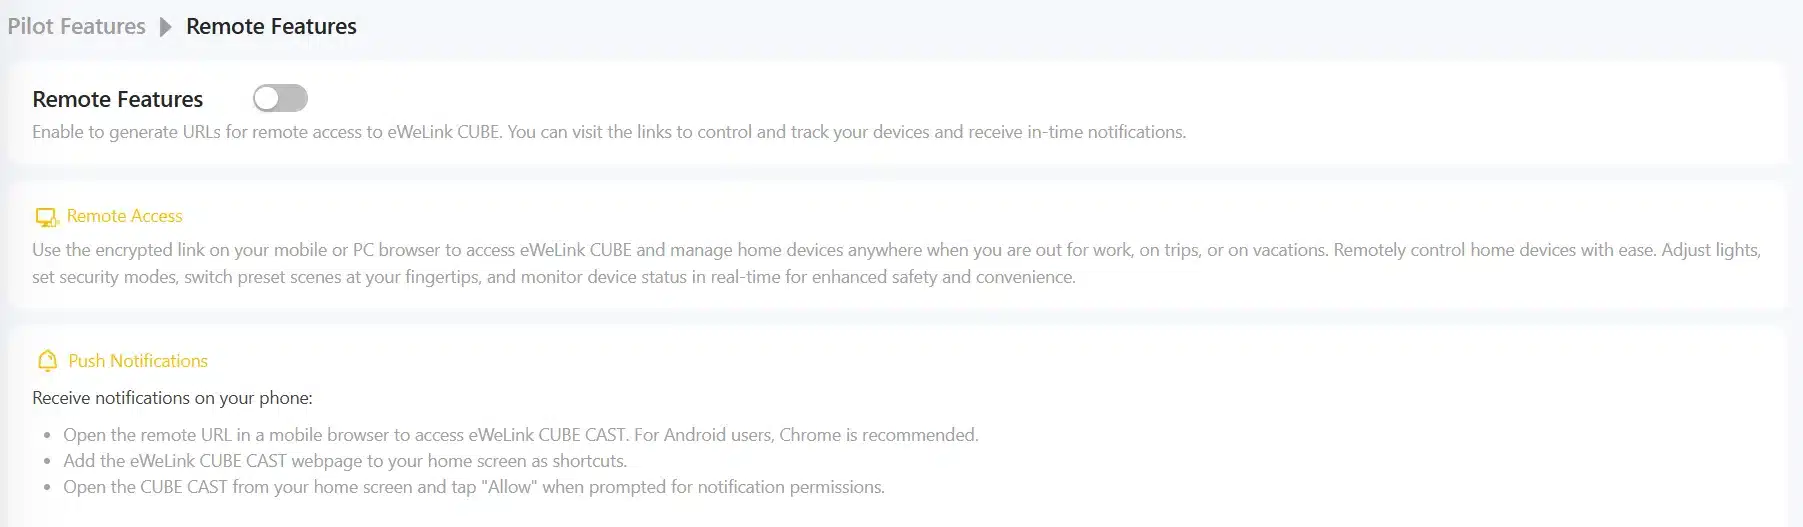
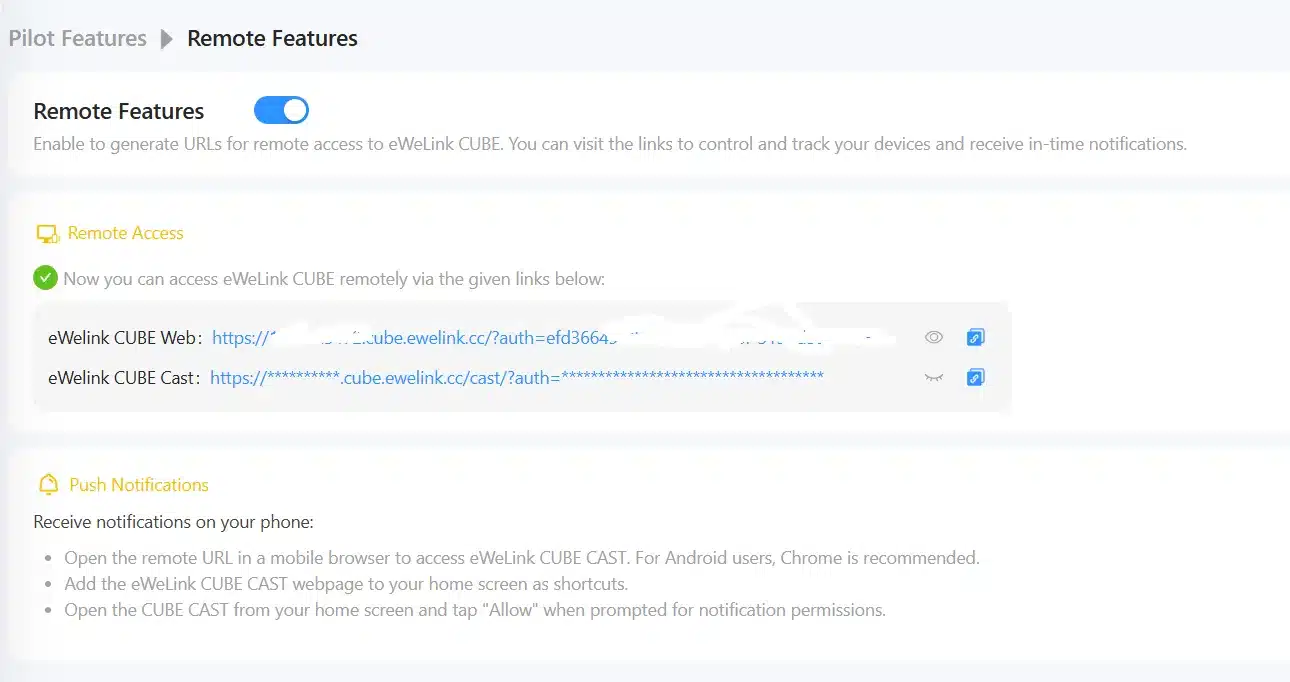
So convenient. Well played, Sonoff! 👏
5. Weather
The built-in weather feature can’t yet be used as a scene trigger. That would be great!
There’s a workaround with Node-RED and OpenWeather, but it’s a bit advanced and not ideal for a moving vehicle (static GPS coordinates, etc.).
However, the Forecast feature is available natively, and with Node-RED you can go even further: connect OpenWeather, create virtual sensors (temperature, humidity, wind, rain chance), and automate actions like closing blinds when it’s windy.
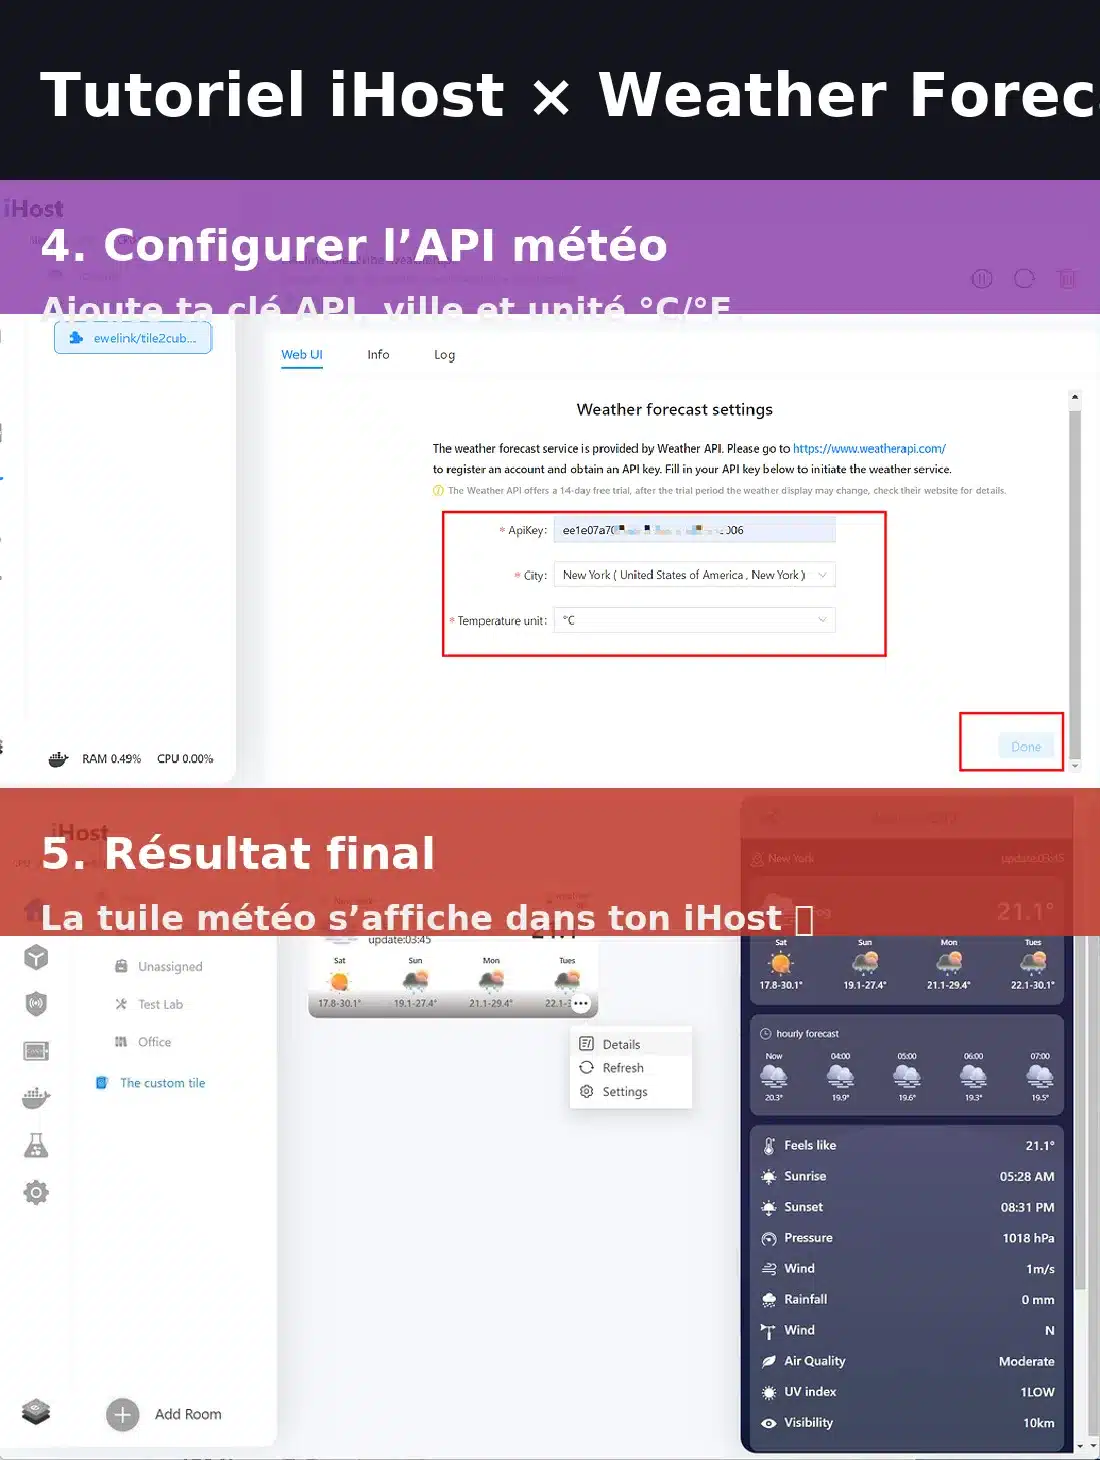
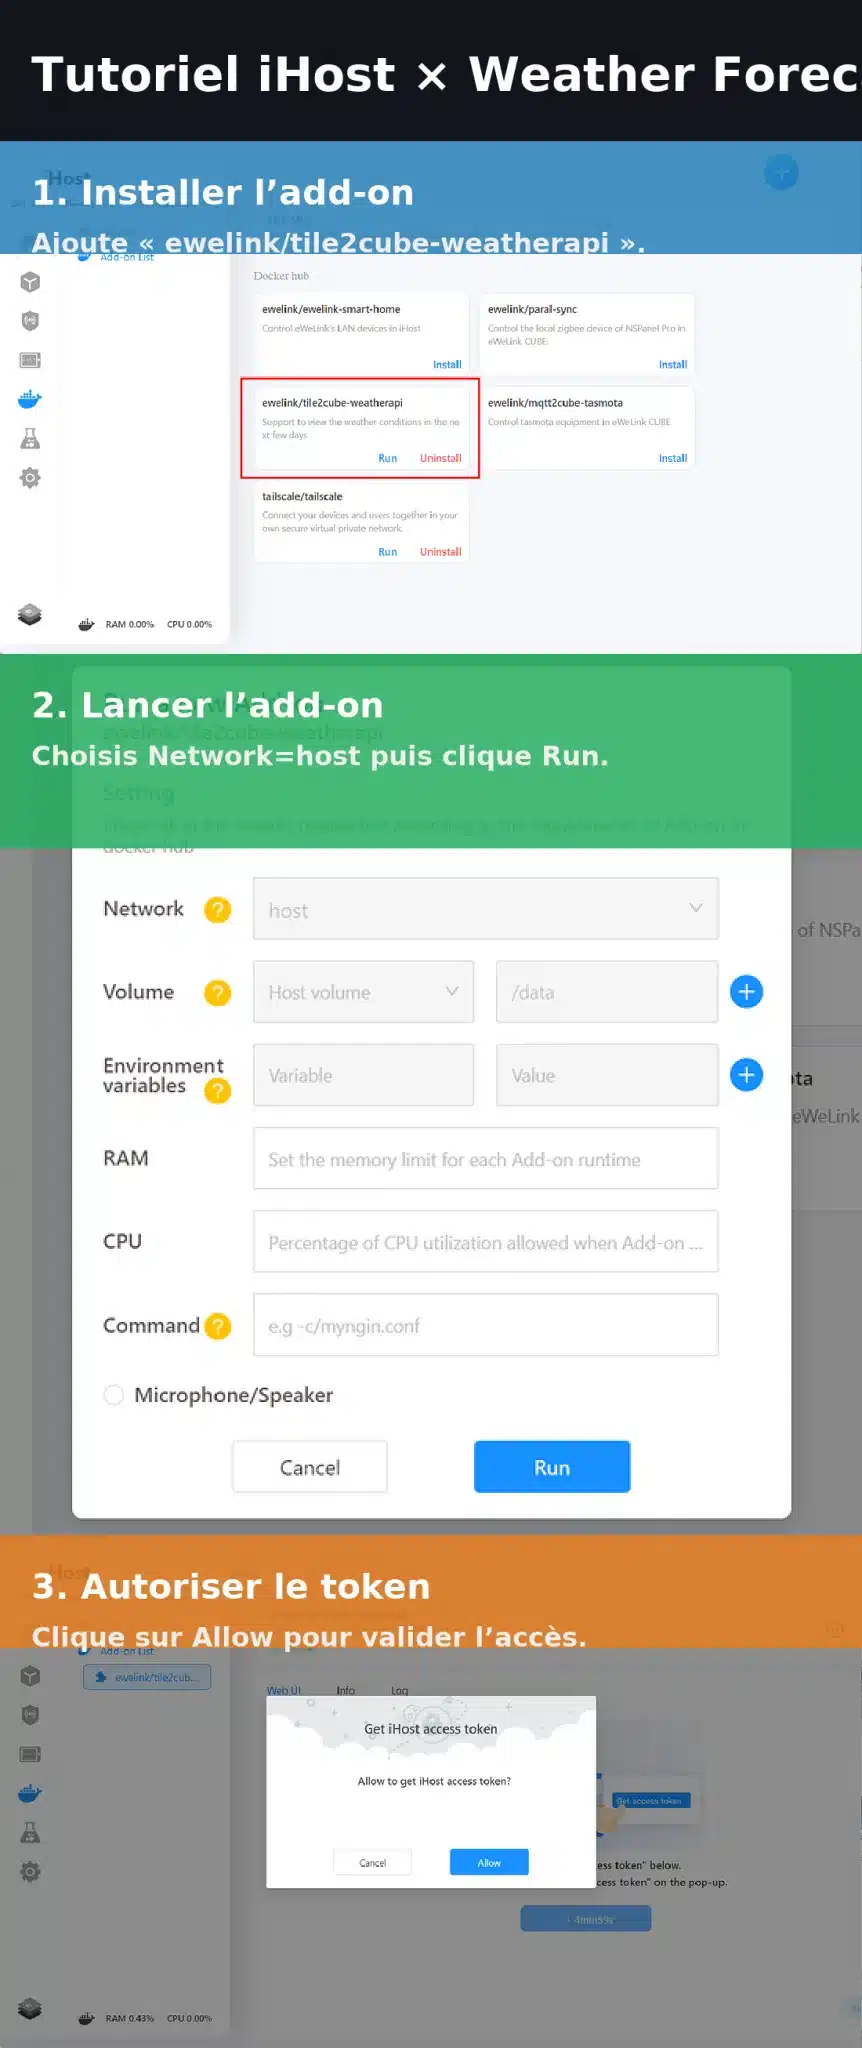
To try openweather you can test this tutorial
🟢 Step 1 – Install Node-RED on iHost
-
Connect to your iHost’s web interface (type its local IP in your browser, e.g.
http://192.168.1.50). -
Open the Docker menu in the sidebar.
-
Click Add Container / Create Container.
-
Search for nodered/node-red (the official image).
-
Configure it like this:
-
Container Name: nodered
-
Ports: Host 1880 → Container 1880
-
Volumes (optional): map
/datato keep your flows
-
-
Click Deploy.
-
Wait a few seconds — your Node-RED container will start.
-
Verify it’s running: open a browser and go to
http://[your_ihost_ip]:1880→ you should see the Node-RED interface (white page with “drag & drop” blocks).
✅ Node-RED is now installed and accessible.
🟢 Step 2 – Create an OpenWeather account and API key
-
Click Sign Up and create a free account (email + password).
-
Once logged in, go to API Keys → Generate Key.
-
Example:
ihost_key.
-
-
Copy your key (looks like
d8e3ac1f0b1234567xxxxxx). -
Under Subscriptions, enable the One Call API 3.0 plan (free up to 1000 requests/day — plenty if you poll hourly).
✅ You now have a valid API key.
🟢 Step 3 – Build your weather URL
Example:
-
lat / lon → your GPS coordinates (here Paris).
-
units=metric → °C and km/h.
-
lang=en → English results.
-
exclude=hourly,minutely,alerts → keeps only current + daily data.
-
appid=… → your API key.
Paste the URL into your browser → you should get a JSON file full of numbers.
🟢 Step 4 – Fetch data in Node-RED
-
Drag an Inject node (light-blue) onto your workspace.
-
Name = Every hour.
-
Repeat → interval → 3600 sec (1 h).
-
Tick “On Start”.
-
-
Drag an HTTP Request node (green).
-
Method = GET.
-
URL = your OpenWeather URL.
-
Return = Parsed JSON.
-
-
Drag a Debug node (green-light with a bug icon).
-
Output =
msg.payload.
-
-
Wire: Inject → HTTP → Debug.
-
Click Deploy (upper-right red button).
-
Click the small square on your Inject node.
👉 In the right panel, you should see weather data (e.g. "temp": 12.34).
✅ Node-RED is now talking to OpenWeather!
🟢 Step 5 – Create virtual sensors inside iHost
To make iHost display the data like real Zigbee sensors :
-
Install the Cube Adapter add-on (if not already).
-
In Node-RED, add an Inject node (run at startup).
-
Add a Register Device node (from Cube plugin).
-
Name = Outdoor Temperature.
-
Device ID = generate a UUID (via uuidgenerator.net).
-
Capabilities = Temperature.
-
Default value = 0.
-
-
Connect Inject → Register Device → Deploy.
Repeat for each sensor you need :
-
Current Temperature
-
Current Humidity
-
Wind Speed (km/h) → map to humidity channel if needed
-
Rain Chance (%)
-
Tomorrow’s Max Temperature
✅ They’ll appear in iHost as virtual devices.
🟢 Step 6 – Link OpenWeather data to the sensors
After your HTTP Request node, add a Change node to format values :
-
Example – Temperature
→ connect to your “Outdoor Temperature” sensor via a Put Device State node.
-
Humidity :
-
Wind (km/h) :
-
Tomorrow’s Rain Chance (%) :
Deploy → the sensors will auto-update every hour.
🟢 Step 7 – Check in iHost
Open the iHost app → your virtual sensors now show live values :
-
14 °C
-
65 % humidity
-
12 km/h wind
-
30 % rain probability
Charts fill in automatically, just like with physical sensors.
🟢 Step 8 – Create a weather-based automation
In iHost → Scenes → New Scene → Add Trigger :
-
Example 1 : Wind > 20 km/h → Close the awning.
-
Example 2 : Temp > 30 °C → Turn on A/C at 6 PM.
-
Example 3 : Rain forecast for tomorrow → Pause garden watering.
✅ You now have a smart iHost that anticipates the weather!
6. Audio-Visual
In the first version of the project, I had integrated the TV into the smart system.
In practice, keeping a relay powered all the time for something we rarely use made no sense — we only watch TV when it rains for days and we’re not exploring new places.
So, I dropped it. (I could’ve used the same 12 V relay module described above if needed.)
7. Homebridge and Matter
I’m not using them yet, but Matter support and Homebridge compatibility really open the door to future upgrades.
8. Conclusion
When I started the first version of this smart-van project, it was more of a “can we do it?” idea.
Now, after months of use, some functions proved genuinely useful — like the connected alarm to check what’s happening when I get an alert, or maintaining a decent temperature in the van for my 18-year-old dog (and his owner 😄).
It even helps avoid flooding the van during heavy rain!
👍 Highlights
-
Battery autonomy improved — about twice as long compared to the old RPi4 setup.
-
Silent: no noisy fans keeping you awake.
-
Less maintenance: no more loose wires or GPIO issues due to vibrations.
-
Compact and reliable: less space, fewer worries.
-
More plug-and-play: unlike my old Jeedom install, which needed constant plugin care.
-
Future-ready: Matter support, Docker integration, and Node-RED make it very flexible.
🔧 Could be improved
-
Batteries in Zigbee sensors don’t last long under extreme temperatures.
-
Water-level sensors could be more reliable (but would need more power).
-
Camera still not usable without internet.
-
Weather can’t yet be used as a scene trigger.
In short:
With Sonoff iHost, I finally have a compact, silent, low-power, and reliable smart-home system — perfect for a van or camper.
Hope you enjoyed this article as much as I enjoyed writing it.
✨ And remember: life is a celebration.