Tags : Secure Jeedom / Home Assistant Fail2ban
Translate by AI
0. Why Fail2ban?
Fail2ban is a simple tool that monitors login attempts (SSH, HTTP…) and automatically blocks IPs that are too persistent.
Perfect for preventing brute-force password attempts or abusive access to Jeedom.
I was initially worried about accidentally banning myself, but with a few tweaks, we can prevent that from happening!
1. Installing Fail2ban
Connect to your Jeedom via SSH and type:
sudo apt update
sudo apt install -y fail2ban
Yes, that’s it… already done!
2. Basic Configuration
Edit the main configuration file:
sudo nano /etc/fail2ban/jail.local
Paste this content (don’t forget to change 192.168.0.0 to match your local IP range, e.g. 192.168.1.0):
[DEFAULT]
ignoreip = 127.0.0.1/8 ::1 192.168.0.0/16
bantime = 900
findtime = 600
maxretry = 8

[sshd]
enabled = true
port = ssh
logpath = /var/log/auth.log

[http-jeedom]
enabled = true
port = http,https
filter = jeedom
logpath = /var/www/html/log/http.error
maxretry = 8
ignoreip prevents Fail2ban from banning you while you’re on your local network — which would be a pain!
3. Create the Jeedom Filter
sudo nano /etc/fail2ban/filter.d/jeedom.conf
Add this content:
[Definition]
failregex = <HOST>.*"(GET|POST).*\/index\.php.*HTTP.*" 401
This filter detects 401 errors (failed login attempts to Jeedom).
4. Restart Fail2ban
sudo systemctl restart fail2ban
Check if the jail is active:
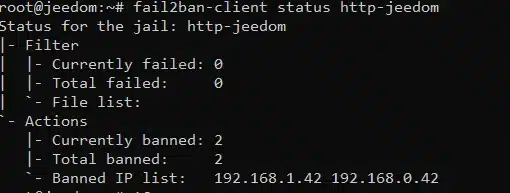
sudo fail2ban-client status http-jeedom
5. Simulate a Banned IP for Testing
sudo fail2ban-client set http-jeedom banip 192.168.1.42

Check the result:
fail2ban-client status http-jeedom
Unban it if needed:
fail2ban-client set http-jeedom unbanip 192.168.1.42
6. Create a Script to Show Banned IPs in Jeedom
Create the script:
sudo nano /usr/local/bin/ip_bannies.sh
Script content:
#!/bin/bash
fail2ban-client status http-jeedom | grep 'Banned IP list' | cut -d: -f2- | tr -d ' ' > /tmp/ip_bannies.txt
Make it executable:
sudo chmod +x /usr/local/bin/ip_bannies.sh
7. Run This Script Automatically
Add it to cron: :
sudo crontab -e
Add this line at the end: :
* * * * * /usr/local/bin/ip_bannies.sh
The file /tmp/ip_bannies.txt will always contain the updated list of banned IPs.
8. Create a Jeedom Scenario to Display Banned IPs
In Jeedom, create a scenario.
8.1 Bloc code (PHP) :
$banned = @file_get_contents("/tmp/ip_bannies.txt");

if (trim($banned) == '') {
    $banned = "Aucune IP actuellement bannie.";
} else {
    $banned = "IP bannies : " . $banned;
}

scenario::setData("ipbannie", $banned);
8.2 Message Block :
Send the message via Jeedom Connect or another method using:
variable(ipbannie)
8.3 Result
- If some IPs are banned:
Banned IPs: 192.168.0.42- If none:
No IPs currently banned.

8.4 Check logs if needed: :
tail -f /var/log/fail2ban.log

Conclusion
A simple little tutorial that adds an extra layer of security to our beloved home automation system.
Remember — life is a party!
— Loïc