tags : Frigate, Jeedom home automation
0. Context
Hello everyone, like many, I’m trying to make my home automation work as much as possible locally, and for that, I’ve decided to let Frigate manage my cameras. Until now, we were retrieving MQTT topics with JMQTT or Mqtt manager and had to do everything our own way. Then the incredible Sagittaz gave us the possibility to do everything via his plugin, which is also free! A huge thank you to him.
1. Installation
Start by installing the Frigate plugin.
Then fill in your configuration.
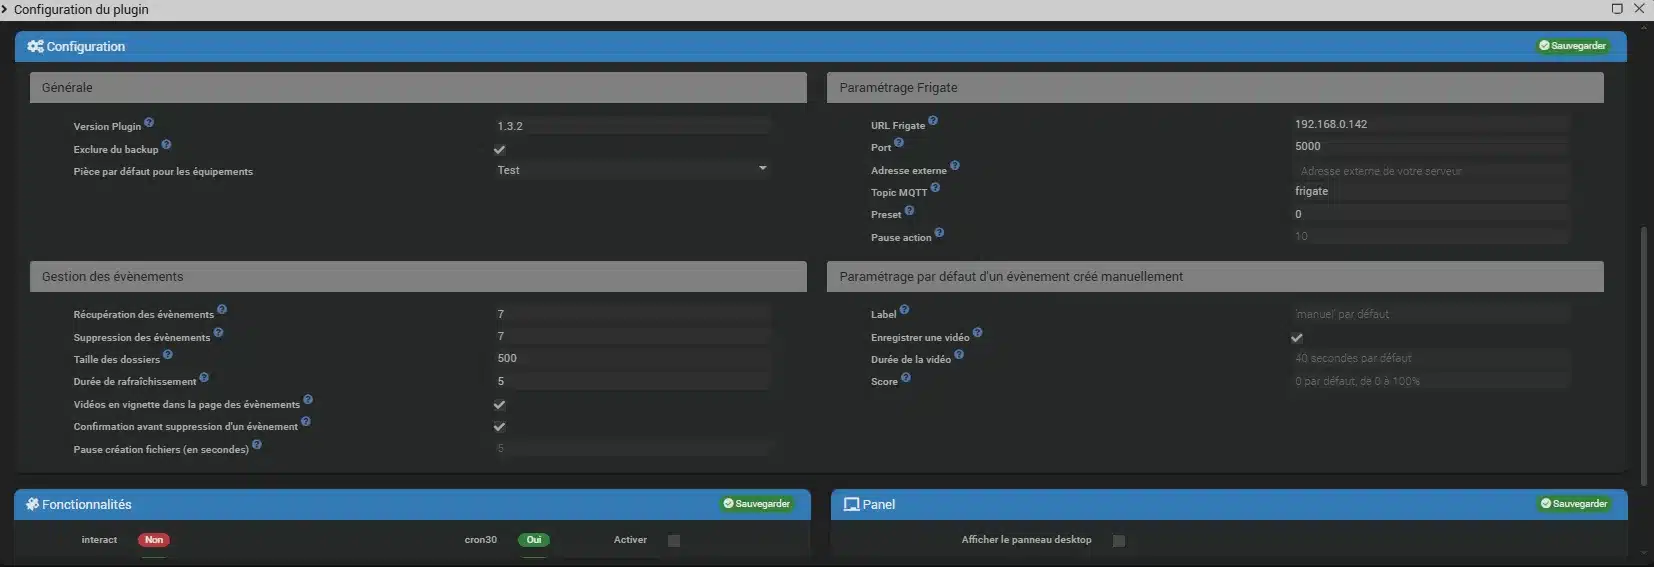
1.1 Générale
Excluding clips and snapshots is interesting because it prevents them from being included in your Jeedom backups, which is a good idea given the potential size. You can also choose a default room for new equipment; I have a test room that allows me to test certain devices directly on the production Jeedom VM.
1.2 Frigate Settings
- URL: the URL of your Frigate server (e.g., 192.168.0.142)
- Port: the port of the Frigate server (5000 by default)
- External Address: Working locally, I don’t need to enter an external address, but it can be useful if you want to access Frigate from outside via Jeedom, for example.
- MQTT Topic: the topic of your Frigate server (frigate by default)
- Preset: For PTZ cameras, define the number of positions you want to retrieve.
- Pause action: Pause to be performed on PTZ actions. For example, after pressing move up, a stop is automatically performed: you can define the time before this stop action from 0 to 10, corresponding to a pause of 0 to 1 second (0, 0.1, 0.2, etc.). This allows slower cameras to receive the command in due time.
1.3 Event Management
- Event retrieval: You can have 30 days of events on your Frigate server but want to import only 7 into Jeedom. Indicate the desired number of days here. If the number of days is 0, then the process is stopped and no calls to the Frigate API are made.
- Event deletion: Events older than the indicated number of days will be deleted from the Jeedom database (not from the Frigate server). I set it to one week because I consult notifications more than events, so if something were to happen, I have enough time to react. The number of days for deletion cannot be less than the number of days for retrieval. Otherwise, the number of days for retrieval will be used.
- Folder size: Maximum size of the data folder on Jeedom. For me, I limited it to 500 MB.
- Refresh duration: In seconds, the refresh duration for your camera snapshots. (5 seconds by default)
- Videos in thumbnail: When hovering over a thumbnail on the event page, the video will play.
- Confirmation before deletion: Displays an alert before deleting an event.
- Pause file creation (in seconds): Waiting time before creating the file (clip / snapshot) (5s by default). Depending on the servers, this may be necessary to give Frigate time to create the file.
1.4 Default settings for a manually created event
- Label: the name of the created event (manual by default).
- Record a video: yes by default.
- Video duration: 40 seconds by default. Score: 0 by default.
1.5 1.5 Importing cameras
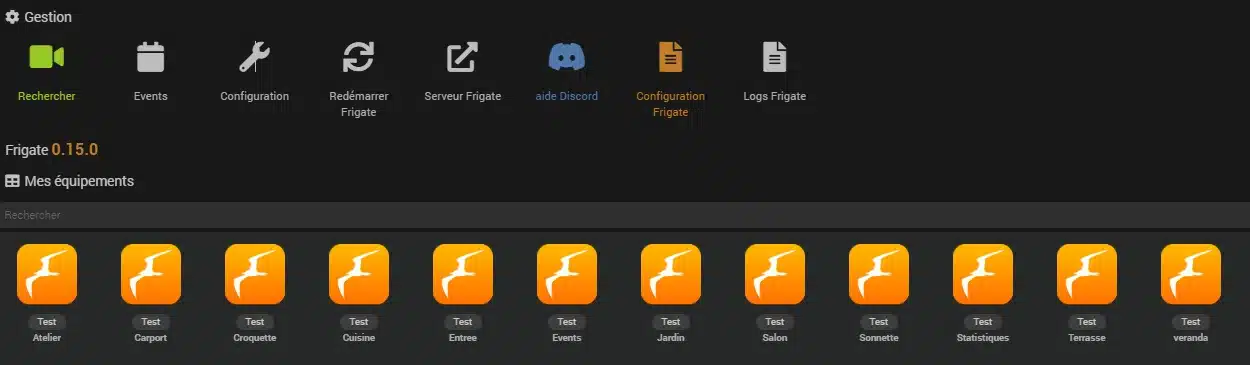
Click on search and presto, it automatically adds your cameras.
1.6 Option
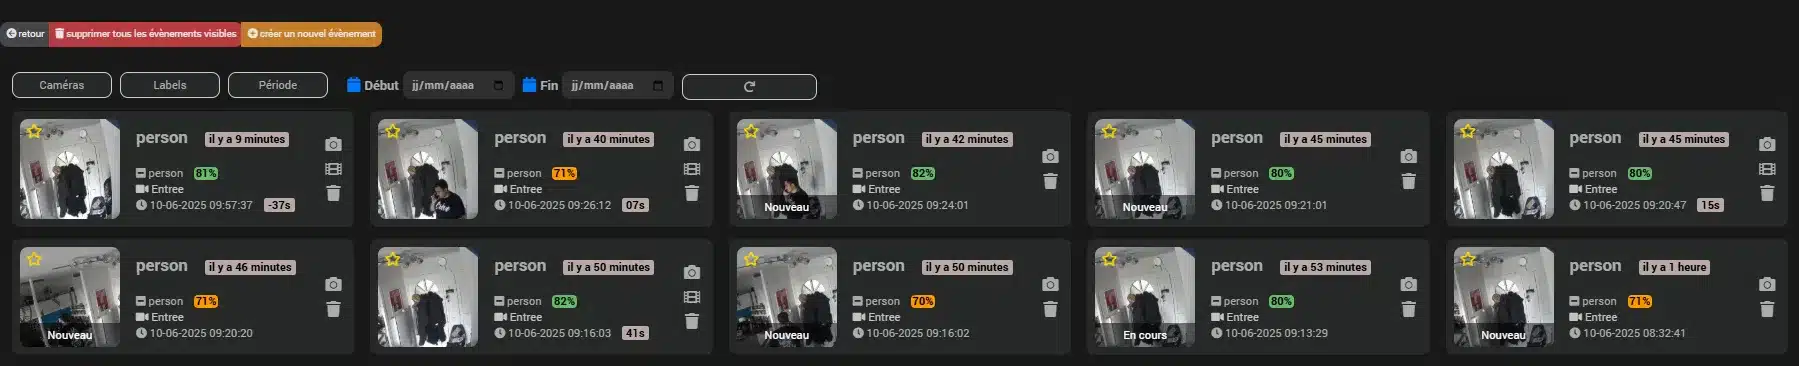
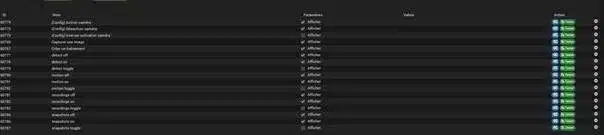
1.6.1 Events
Everything is classified by camera and gives you a visual, the type of detection, the date and the score.
1.6.2 Restart Frigate
A simple button that allows you to restart your Frigate server without needing to connect to it.
1.6.3 Frigate server
Simply allows access to your Frigate server locally or via external access depending on your configuration.
1.6.4 Discord Help
Allows you to request assistance on Sagittaz’s (Jeemate) Discord.
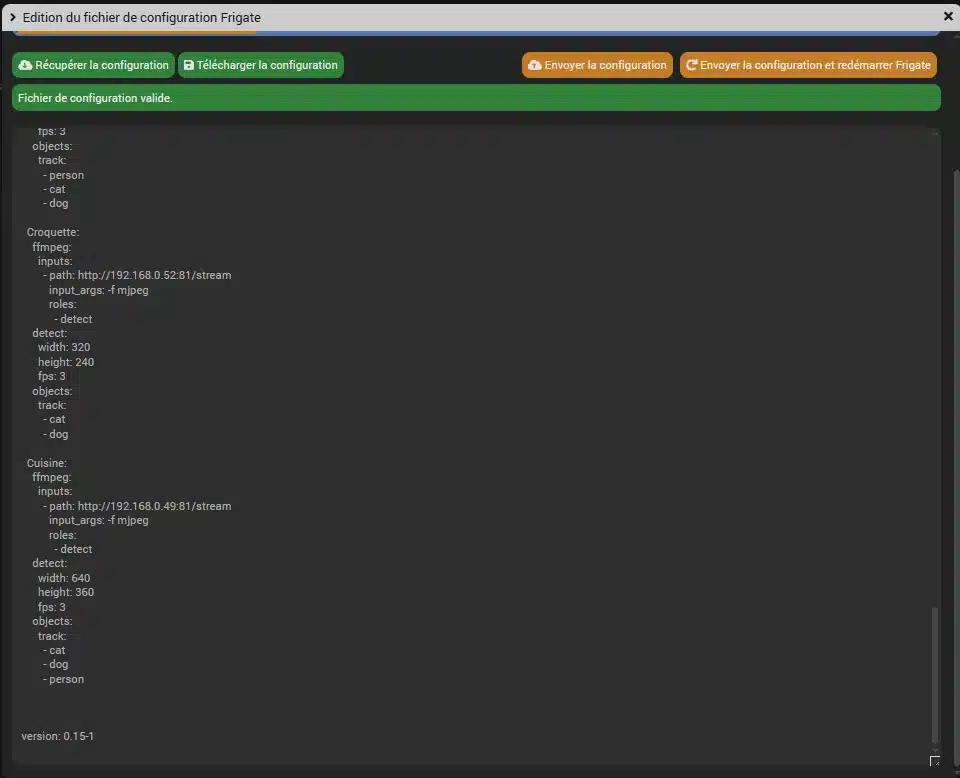
1.6.5 Configuration
Allows you to modify your configurations.yaml files. BE CAREFUL WITH YOUR MODIFICATIONS !!!
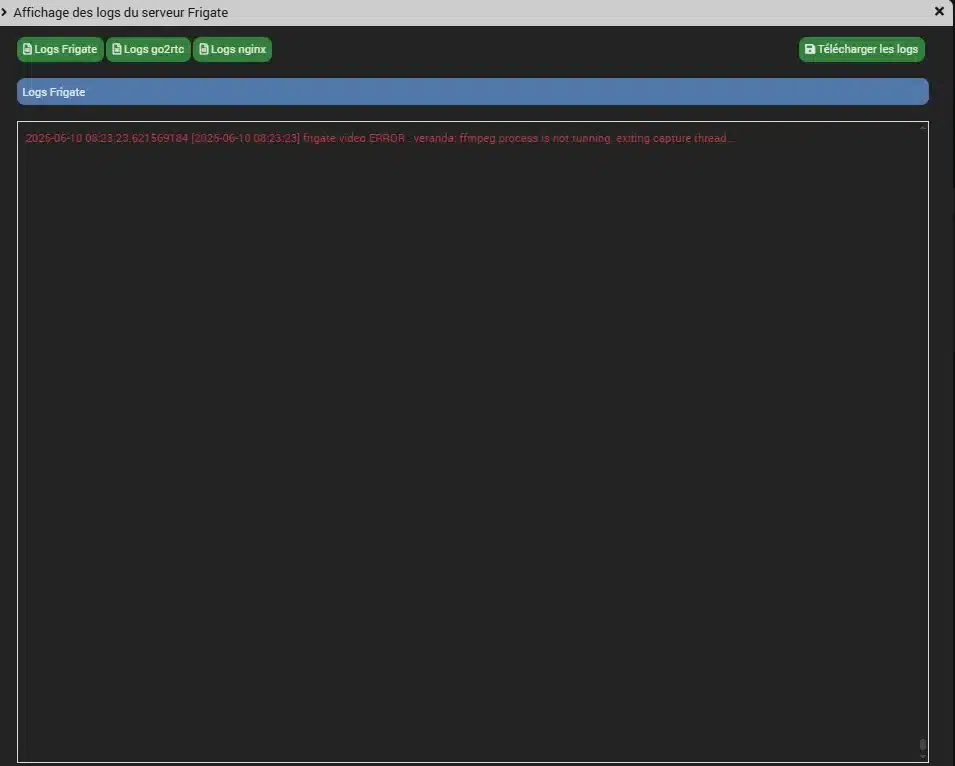
1.6.6 Logs
Allows you to view your logs directly in the plugin in real-time
2. Example of a camera
Let’s take the example of my Carport camera which needs to detect people and cars in my Frigate configuration.
  Carport:
    ffmpeg:
      inputs:
        - path: rtsp://USER:MOTDEPASSE@192.168.0.46:554/live/ch1
          roles:
            - detect
    detect:
      width: 640
      height: 360
      fps: 3
    objects:
      track:
        - person
        - car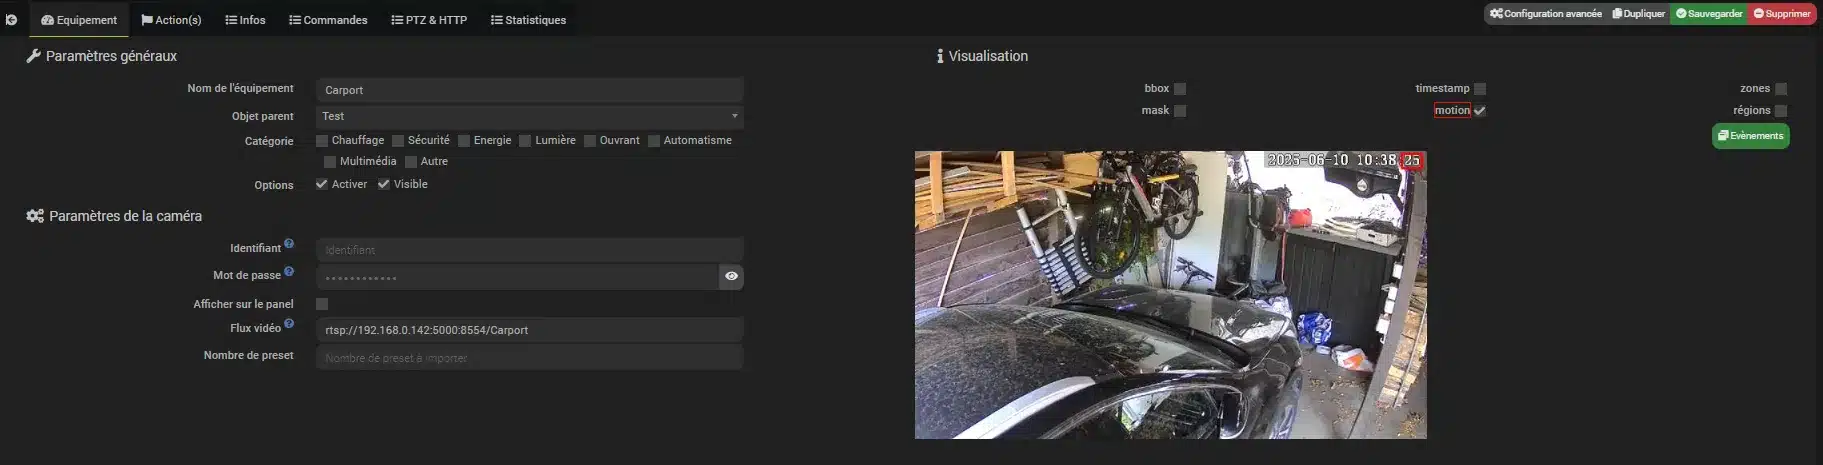
Here I can choose several options such as displaying this camera on the panel (provided I have enabled it in the options), displaying my masks, movements via red squares, etc.
Creating actions on detection
2.1 General Condition
The general condition, oddly, indicates here in which case the actions SHOULD NOT be executed. For example, if you configure the condition as follows: #[Maison][Mode maison][Mode]# == “présent” The actions will only be executed if the mode is anything other than « present ». When you add an action, you therefore get the following options:

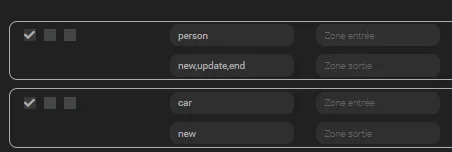
2.2 Label
As a reminder, the label is what triggers the detection (person, vehicle, animal, etc.) In the label field, simply indicate the label(s) for which you want the action to be executed. If this field is empty or you enter all , then the action will be executed for all new events. You can indicate multiple labels by separating them with commas. Uppercase letters and accents are ignored, so if you enter « Vélo » or « velo », both will be considered identical. For example, in our case, we will put « person » or « car ».
2.3 Type
With MQTT, they can be of type new, update, and end. Without MQTT, it will always be of type end. In the type field, simply indicate the type for which you want the action to be executed. You can enter several by separating them with commas. If no type is specified, the action will be executed only for end type events. Uppercase letters and accents are ignored, so if you enter « update » or « UPDATE », both will be considered identical. It is important to define the type correctly otherwise you will only receive actions if the type is end, i.e., at the end of the detection. For example, if I want to be notified when someone arrives in my carport, the type will be new; by adding update I can have the detection updated, and end for the end of the event.
2.4 Zones
In the entry zone field, simply indicate the zone(s) for which you want the action to be executed. You can indicate multiple zones by separating them with commas. The exit zone field allows you to manage the direction of detection. This only works with a defined entry zone. If the entry zone is triggered before the exit zone, then the action will be executed. I haven’t defined any zones at my place, so this isn’t useful for me.
2.5 Condition de l’action
Indicate here when the actions MUST be executed. For example, you configure the condition as follows: #[Maison][Mode maison][Mode]# == “absent” The actions will only be executed if the mode is configured as absent. If no condition is specified, the action will be performed. I can, for example, check that my house mode is Absent and that the detection score of a person is greater than 80 via #[Domotique][Attitude maison][Mode]#=="Absent" and #score# >80.

2.6 Action
I can then trigger an action or a notification.
Action Example Here, as soon as a car detection occurs, I set my « car » virtual to 1.

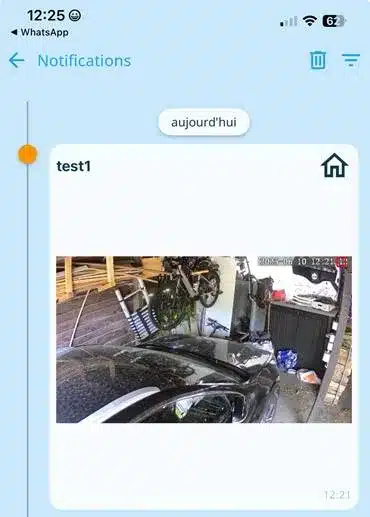
Example with a notification in Jeedom Connect:
- JeedomConnect Plugin
- snapshot: in the title field:
title=your title | files=#snapshot_path# - clip: in the title field:
title=your title | files=#clip_path# - Preview gif:
title=your title | files=#preview_path#
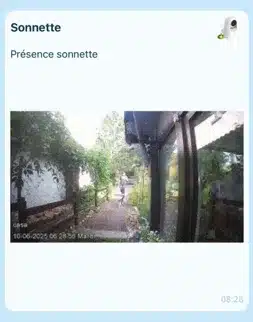
- snapshot: in the title field:

For example: title=#camera# | files=#preview_path# and the message Presence doorbell at #start# will give me:
In other notification programs, here are the suggestions:
- JeeMate Plugin
- snapshot: in the title field:
title=your title;;bigPicture=#snapshot# - preview: in the title field:
title=your title;;bigPicture=#preview# - thumbnail: in the title field:
title=your title;;bigPicture=#thumbnail# - clip: in the title field:
title=your title;;bigPicture=#clip# - For automatic notification, add
frigate=#jeemate#, available with the future v3 of JeeMate. - snapshot: in the title field:
title=your title;;bigPicture=#snapshot#;;frigate=#jeemate# - clip: in the title field:
title=your title;;bigPicture=#clip#;;frigate=#jeemate#
- snapshot: in the title field:
- Telegram Plugin
- Test both snapshot commands. Depending on the configurations, one of them might not work.
- snapshot: in the options field:
title=your title | snapshot=#snapshot# - snapshot: in the options field:
title=your title | file=#snapshot_path# - clip: in the options field:
title=your title | file=#clip_path# - preview: in the message field:
#preview#
- Mobile v2 Plugin
- snapshot: in the message field:
your message | file=#snapshot_path# - clip: no idea
- snapshot: in the message field:
- NTFY Plugin
- snapshot: in the options field:
Title:your title;Attach:#snapshot# - clip: in the options field:
Title:your title;Attach:#clip#
- snapshot: in the options field:
For the rest, it’s up to your imagination: For example, as soon as a cat is spotted and I am absent, I send myself a photo

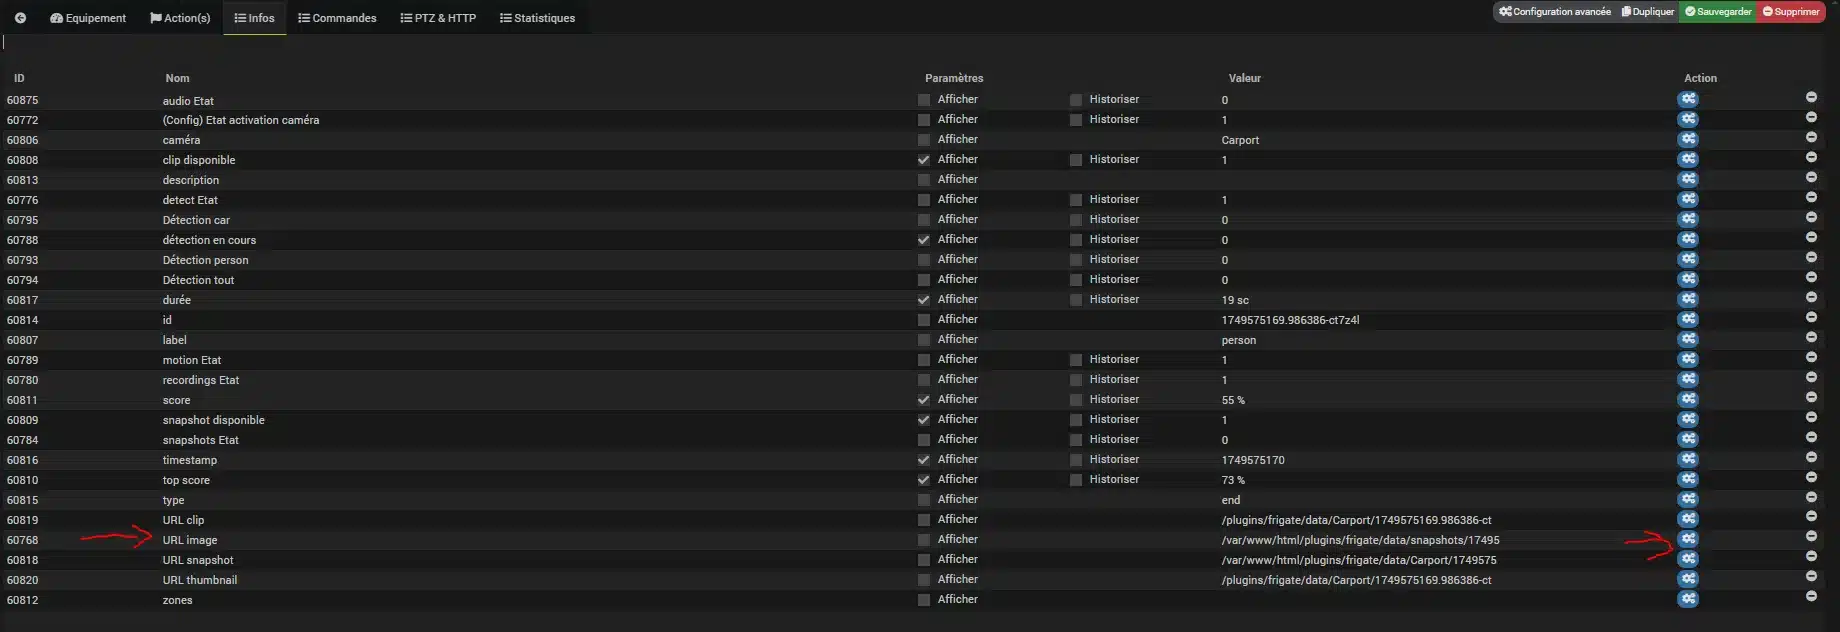
2.7 Info
We have a lot of exploitable information here via actions on values or via a scenario. For example, as soon as « car » detection is 0, I set my « car » virtual to 0.

2.8 Command
« Command » allows you to act on the camera’s configuration in Frigate.
2.9 Creating a snapshot
I need to trigger a capture directly without going through Frigate’s AI detection , for example, a door opening, smoke, etc. I create the following action in my scenario:

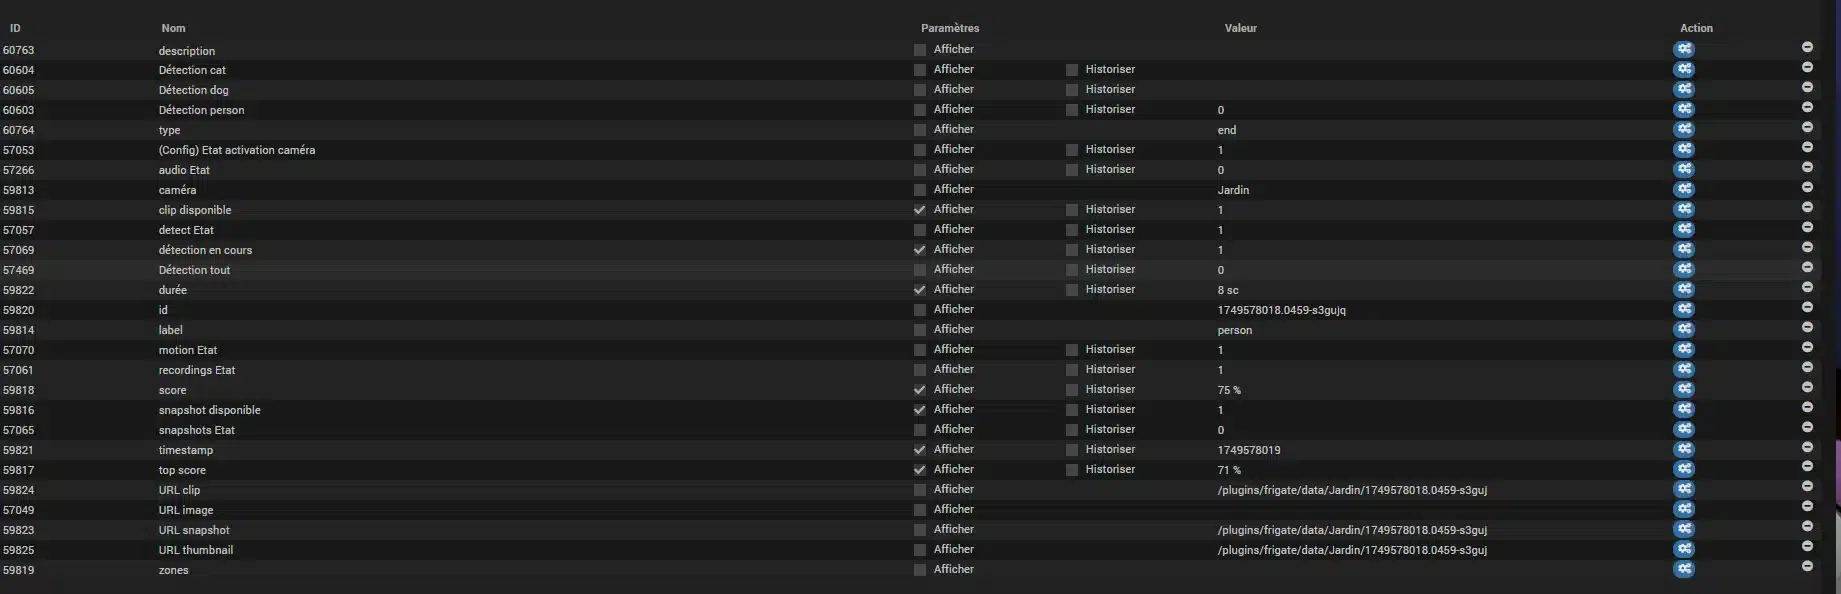
Then I go to my Frigate camera in question in the « info » section. I look for « image URL » and go to the cogwheel.
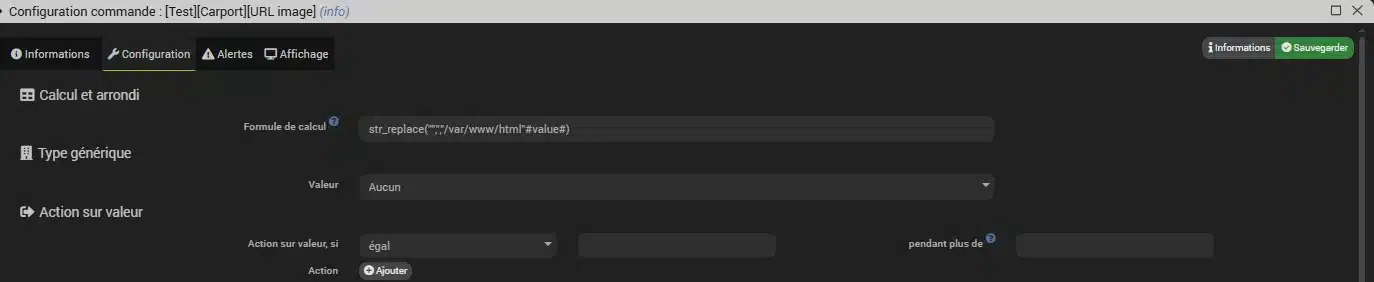
I just need to go to the configuration section and in « rounding » insert the following formula: The URL is in the form /plugins/frigate/data/camera/id_snapshot.jpg to adapt to as many communication plugins as possible. For example, if you want a complete URL, you can put this in the configuration, calculation, and rounding of the info command: str_replace('"','',"https://monjeedom.eu.jeedom.link"#value#) Or for those who need the path like Jeedom Connect: str_replace('"','',"/var/www/html"#value#)
nd that gives you:
3 Example of scenario
For example, when someone rings my doorbell, I use this scenario:

I hope you enjoyed this plugin presentation.
Have a great day and above all, don’t forget that life is a celebration!
Loïc